Showing posts sorted by relevance for query 4 flour. Sort by date Show all posts

Wednesday, July 22, 2015

Copy Cat Restaurant Teriyaki Sauce & Marinade plus a Delicious Teriyaki Rice bowl - Gluten-Free, Sugar-Alternative, Paleo, Clean-Eating

Restaurant Teriyaki Sauce

Do you like that nice, thick, sweet teriyaki sauce you get 

at your favorite Asian restaurant or takeout joint?


With this new recipe you can now have it at home. 


I have tried a few home made Teriyaki recipes through the years, but they are very runny and usually too heavy on the soy sauce. I want to taste the ginger and garlic, not just sugar and soy sauce. I created this recipe to be used over Teriyaki bowls, or for glazing and dipping grilled chicken or salmon in, or even drizzle over a sushi roll! I wanted the sauce to cling nicely to the meat, not run off in a salty puddle at the bottom of my dish. I'm even going to try it in a dish called Yaki Udon (Grilled chicken, stir-fried vegetables, drained, cooked udon noodles + this sauce).

I have made this Teriyaki sauce with a healthier sweetener called organic coconut palm sugar. It looks like a more granular, dry brown sugar and it has a brown sugar type taste. It is high in minerals and is lower on the glycemic scale than regular sugar. It is not zero calorie like erythritol, but it tastes better in this sauce. If I were to make this sauce completely sugar free, I would use a combination of erythritol, xylitol, stevia glycerite and a touch of black-strap molasses. Just sayin'.

I also use a gluten free soy sauce called Tamari. It is a high quality soy sauce and is easy to find at oriental markets or your better grocery stores. Alternately you may use Bragg's Aminos, but this is not my first choice. 

I prefer to use fresh garlic and ginger for the best flavor. I like to store whole ginger root in a small freezer bag in my freezer (in a place where I can find it!). Whenever I need fresh ginger, I just pull it out of the freezer and grate the amount I need with a small Microplane grater. You can grate fresh garlic with a small Microplane too, but I prefer to smash it to death in my mortar & pestle.

I thicken this sauce with xanthan gum. Xanthan gum is easy to use and is a healthy soluble fiber. I much prefer it over using corn starch or other starches for thickening. Starches must be cooked unless they are modified starches. Starches also have carbs unless they are resistant starches. Xanthan gum thickens regardless of it being heated or not. I love using it in my home made salad dressings too. The easiest way to mix xanthan gum into your liquid ingredients is to first blend it with some of the dry ingredients, like sugar, salt, flour, etc...

This sauce recipe is easily halved. You can also start out making it less sweet by adding 3/4 cup of the sweetener, bringing it to a simmer, taste for sweetness and then add more sweetener as desired.


Restaurant Teriyaki Sauce


Restaurant Teriyaki Sauce Recipe:

1 c. Tamari soy sauce (or Bragg's Aminos, are both gluten free)
1/4 c. Mirin (sweet rice wine)
1 1/4 c. purified water
1 T. minced fresh garlic (about 6 large cloves)
1 T. minced fresh ginger
1 1/4 c. organic coconut palm sugar
3/4 to 1 t. xanthan gum


Garnishes (optional):

sesame seeds
scallions sliced on the diagonal
toasted sesame oil


Method:

In a small sauce pan mix the soy sauce, mirin, water, garlic, and ginger.

Turn the stove on to medium heat.

In a separate small bowl mix together the palm sugar and the xanthan gum.

Whisk the sugar mixture into the soy sauce mixture.

Bring up to a gentle simmer with stirring to dissolve the palm sugar. 

Once it starts to simmer, time it for one minute and then remove from heat. 

Set aside to cool and use to glaze your favorite meat or use as a dipping sauce.

Add garnishes as desired at serving time.

Store unused Teriyaki Sauce in the refrigerator. Gently reheat to use.


To Make as a Marinade:

Make the sauce in the same way, except omit the xanthan gum.The result will be a thin marinade.

Note: I also use the thickened sauce recipe as a marinade.


Tips:

For a less sweet sauce, cut the coconut palm sugar down to 1 cup, or to taste.

For a slightly thinner sauce use only 3/4 t. xanthan gum.

Mixing the xanthan gum into the dry sugar first makes the xanthan gum easy to disperse into your sauce without clumping issues. If you forget to do this, use a stick blender to blend the xanthan gum into your sauce thoroughly.


 Photos of making Teriyaki Sauce and Teriyaki Rice Bowl:

Putting the sauce ingredients together.

The xanthan gum is blended into the coconut palm sugar.

The sauce before cooking.

The thickened Teriyaki Sauce after simmering 1 minute.

Skinless boneless chicken breasts ready for marinating in Teriyaki Sauce.

Teriyaki Sauce rubbed onto the chicken and marinated 30 minutes.


Broccoli, Carrots, Cabbage, Onion, and celery chopped and ready for steaming.


The prepared vegetables in the steamer.


Steam vegetables only until tender-crisp and bright in color.

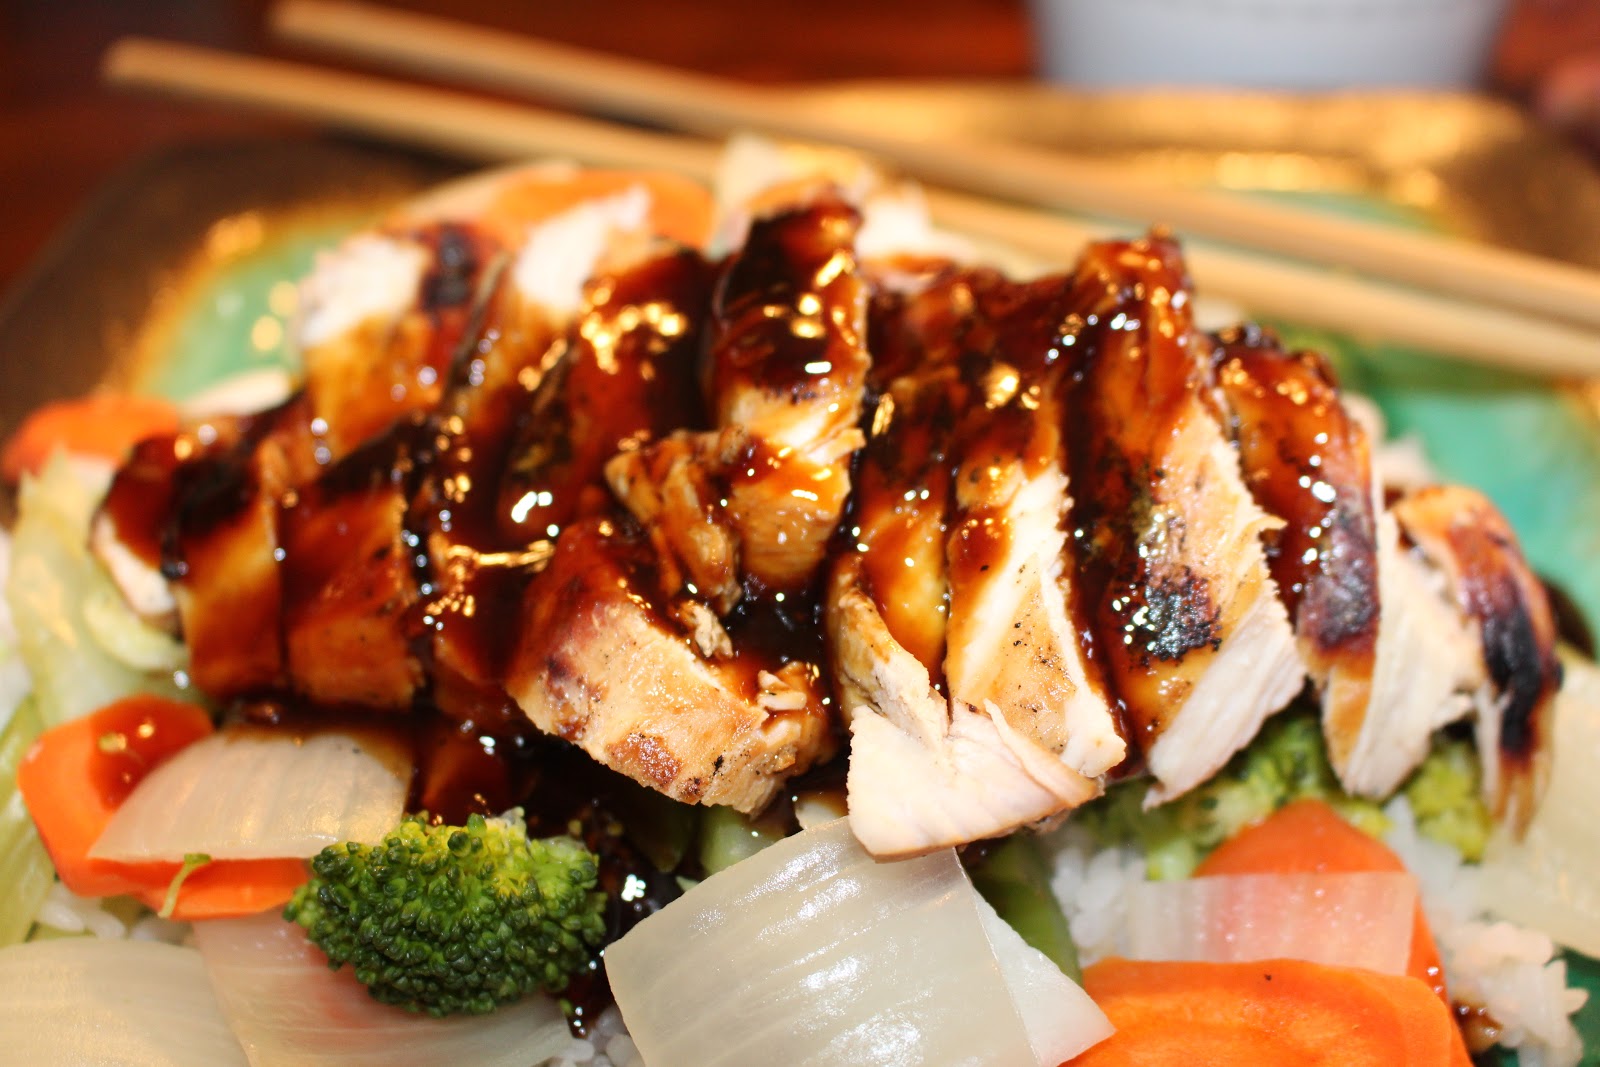
Sushi rice , steamed vegetables & grilled chicken topped with our Teriyaki Sauce. YUM.


Enjoy,

Leila.

Saturday, April 11, 2015

Creamy Parmesan Cauliflower Broccoli Bake

True comfort food: Parmesan Cauliflower Broccoli Bake


This is one of my most favorite casseroles ever. Parmesan Cauliflower Broccoli Bake is a creamy, delicious vegetarian casserole. It makes a great side for just about any meal. It tastes super with or without the added tarragon, marjoram, rosemary, and thyme. You could also use Herbs de Provence or Fine Herbs as well. 

I made my own bread crumbs. It is healthier, super easy to do, and you can make it fresh for pennies. I made this delicious casserole for our Easter dinner this year and served it along side perfectly baked salmon (thanks to my cute husband) and roasted asparagus. It was a terrific meal. 
I have not done it yet, but I know this casserole would taste amazing with some crispy fried onions sprinkled on top along with the bread crumb topping. I am going to do this next time I make this casserole.

I hope you enjoy this comforting casserole as much as we do.


Parmesan Cauliflower Broccoli Bake Recipe:

1/2 c. Herb & Garlic bread crumbs (like Progresso brand), or home made *
2 T. melted butter
1 lb fresh cauliflower florets and stems
1 lb fresh broccoli florets and stems
1/4 c. plus 2 T. grated Parmesan cheese, divided
2 T. all-purpose flour
1 T. butter (can omit and just use a non-stick spray for the pan, but butter is better!)
1 large onion, diced
A pinch of baking soda
1 1/4 c. organic milk
4 ounces neufchatel or cream cheese, softened
1/2 t. garlic powder
1 t. seasoned salt
1/2 t. onion salt
1/2 t. BioSalt, to taste
Fresh ground black pepper, to taste
A pinch each of tarragon, marjoram, rosemary, and thyme, optional


Method:

Wash and trim the cauliflower and broccoli. Peel the tough outer skin off the broccoli stem. dice the broccoli and cauliflower stems into small bite sized pieces. If using frozen cauliflower and broccoli, thaw them completely first. Cut the florets into bite sized pieces.

Preheat oven to 350 degrees. Butter a deep 2-quart baking dish and set aside.

In a small bowl, mix the dry breadcrumbs, 2 T. melted butter, and 2 T. Parmesan. Set aside.

In a large pan saute diced onion until tender in 1 T. butter and a pinch of baking soda, to aid caramelization. (You may just use a non-stick spray instead, but it isn't as tasty.)

Sprinkle flour over cooking onions and stir in well. Saute another minute.

Pour milk over cooking onions and stir in well, until it starts to thicken.

Add the neufchatel or cream cheese and the 1/4 c. Parmesan cheese and stir until the cheeses melt.

Add the garlic powder, seasoned salt, onion salt, and fresh ground pepper. Stir in well and taste.

Add up to 1/2 t. BioSalt, to taste.

Add herbs, to taste, optional.

Add the vegetables and toss well to coat. Scrape into the prepared casserole dish.

Sprinkle the top with the bread crumb mixture.

Bake 45 minutes, or until the top is lightly browned and vegetables are tender.


* To Make the Topping using Quick Home Made Bread Crumbs:

1 heel of a loaf of whole grain bread, crumbled fine
1/4 t. Garlic powder
A pinch each of tarragon, marjoram, rosemary, and thyme
The 2 T. butter called for above


Method:

In a small non-stick frying pan placed over medium heat, transfer the fine bread crumbs. Stir the crumbs around if they are not dried out yet, and gently toast them.

Put the garlic and herbs in the pan and stir a bit until they are fragrant.

Add the 2 T. butter called for and saute until the crumbs are well coated and remove from heat.

Let cool a bit before adding the 2 T. Parmesan cheese. Proceed with the recipe above.


Fresh out of the oven.

A perfect dinner.


Enjoy,

Leila.

Thursday, February 19, 2015

An easy, delicious, and healthier Copy-Cat version of Olive Garden's Zuppa Toscana Soup

Olive Garden's Zuppa Toscana Soup 
Copy-Cat Recipe

Zuppa Toscana Soup

This soup is delicious. It has just a touch of heat, and a touch of sweet from the fennel in the Italian sausage. I made my version more robust and filling. It is comforting on cold nights, yet with a salad, it is great for warm weather too. It is very easy to make, and good for when I am pressed for time. Serve it with a nice hearty salad and you are good to go. Yes, bread sticks are good with it too, but I'm not posting my wheat flour garlic Parmesan bread stick recipe on this healthy eating blog. When we develop a fabulous gluten-free bread stick, then I will post it here.

I like knowing and having control over everything that goes into this recipe, unlike eating it at a restaurant. The BioSalt really helps with water retention issues in the body.

I add quite a bit more kale and potatoes than the restaurant version, frequently their's is a little skimpy on the goods. Kale is so beneficial for your body and this is a delicious way to eat it!


Zuppa Toscana Soup Recipe:

1 pound mild sweet Italian sausage
1 medium to large yellow onion, diced small
4 large garlic cloves, smashed
1 32-ounce carton organic chicken stock
10 ounces purified water (add more water to maintain the liquid level as needed)
3 to 4 organic russet potatoes, scrubbed, quartered, and sliced thin (do not peel)
1/2 to 3/4 t. dried hot red pepper flakes
4 to 6 c. chopped organic kale, woody stems removed (6 cups is about 7 ounces)
40 grinds black pepper, to taste
2 t. BioSalt or sea salt (recipe on this blog)
2 t. onion salt (recipe on this blog)
1 c. organic whole milk
1 c. organic heavy cream


Method:

Saute the sausage and onions in a soup pot until the sausage is crumbly and browned.
Add the garlic and saute in minute.
Add the chicken stock, potatoes, red pepper flakes, and water. Bring to a gentle simmer.
Let simmer until the potatoes are barely tender, but not mushy (about 30 minutes).
Add the chopped kale and simmer a few more minutes, until kale is tender.
Add the milk and cream and warm through with out boiling.
Add the BioSalt and onion salt.
Dilute further with water if it has evaporated.


Tips:

I like the bulk sausage from Sprouts Farmer's Market. It has no MSG or Nitrates, and is gluten-free.This is the ingredient list: Pork, water, sweet Italian seasoning, evaporated cane juice, salt, spices, dehydrated garlic, oil of fennel.

You can remove the sausage casings if you can't find bulk sausage.

You can use 2 cups rich coconut milk in place of the dairy if a Low-Carb or PALEO soup is desired.

I find that salting the soup at the end uses less salt.

If the soup gets too salty, just add a touch more water. The BioSalt is a balanced salt for the body.

You may put all of the ingredients in a large crock pot and cook on high heat 3 to 4 hours.


Enjoy!

Leila


Start by browning the sausage and onions in a large soup pot


Getting the rest of the  ingredients together


The sausage, onions, and garlic are browned


Chop the kale and potatoes


The soup before the milk and cream were added


The finished soup


Author, Leila Wood.

Monday, June 22, 2015

Fully Loaded Chocolate Bombs with Cocoa Nibs, Coconut Oil, Fruit & Nuts (Sugar-Free, Dairy-Free, Paleo) - plus a discussion about healthy fats -vs- sugar & starch.


Fully Loaded Chocolate Bombs.

This is a fabulous chocolate recipe we have kept as a guarded family secret... until now! 


I made these delicious little morsels with my mom during a recent visit with my parents.

This is a super easy and amazingly delicious chocolate recipe. It is based on my mother's healthy sugar-free chocolate formula now being manufactured by a company called Lakanto

We extend the Lakanto Zero-Sugar Dark Chocolate with coconut oil, cocoa powder and other goodies. The chocolate retains it's smooth texture, delicious taste, and has a beautiful shiny surface. 

These cute little chocolate bombs are exploding with flavor and a myriad of textures, and are a real pleasure to eat. We have noticed that this chocolate also curbs the appetite nicely. That means if you eat this, you will eat less of that (not good for you stuff).

You  also get the benefits of healthful coconut oil in your diet, while enjoying a low-carb, sugar-free chocolate at an affordable cost. It's a beautiful thing!

2 T. coconut oil is generally recommended daily for health benefits. An added bonus of adding coconut oil is that this chocolate will no longer require tempering! This is what makes working with this chocolate so super simple and fast. You will love it.

At our house, we have to have this chocolate, I can't imagine life without it now. Seriously.

We love that this is truly HEALTHY chocolate. That's why we are sharing this recipe with you. We are passionate about sharing recipes for foods people deeply crave, and we offer them with a healthy twist. Replacing the foods you love with a better choice, while maintaining it's great taste is what we are all about here at Kitchen Cheetahs.

You can add any inclusions to this chocolate that tickle your fancy. Make your chocolate base first and then you can get creative with it. You could try combinations like candied orange with chipotle, coconut flakes with macadamia nuts, dried pears and pecans, salted raisins and roasted, salted peanuts, pistachios with dried pomegranates, cashews and banana chips... We also love it with just cocoa nibs added.
Cocoa Nibs.


Now, I must tell you that during my recent visit, I ATE at my parents house. If you have ever tasted my mom's cooking, you know what I mean! I was not concerned, but still assumed that I would go home heavier then when I arrived. We ate tons of chocolate-dipped figs, figs and cream, and we made gluten-free, sugar-free rhubarb cake (so yummy), and grilled dry aged beef, and spaghetti with my mom's amazing homemade sauce, unique yellow squash "pasta", drizzled with olive oil,topped with cheese, and gluten-free french baguettes grilled with butter and coconut oil on the side. We also ate various salads with homemade dressings, the buttery scrambled eggs my mom is famous for, and her Sun Warrior Protein Pudding, refreshing green drinks, unique mocktails, and my dad's delicious protein smoothies... and more chocolate! It's all kind of a blur now really. A delirious food coma ensued. Sigh.

I get home and got on the scale and to my amazement... I LOST weight! I ate happily at my parents, without a worry. Mom's food was amazing and definitely not skimping on the fat! I was not deprived in the slightest. I ate good protein, vegies and greens, healthy fats, low-carb and sugar-free desserts. I ate a few gluten-free pretzels and that french bread, but basically eliminated grains, starch, and sugar for that week I was there. This validated my belief about fat -vs- sugars...

There are a few books out now that talk about high-fat diets, promoting healthy fats. Interesting, and I like it because eating fat leads to satiety (greater food satisfaction). Our bodies seem to know when we have had enough fat and our appetite quiets down. I think people who eat fats are happier too. I believe it is sugar and starch that generally cause obesity, not healthy fats. The more processed the sugar and starch is (white flour, white sugar, white starch) the worse it is for our bodies. Starch converts to sugar so fast in the body, it can make your head spin. A chemist friend of mine told me that starch converts to sugar in the mouth within seconds. Research shows that sugar leads to body inflammation and inflammation is underlying all disease. I figure that starch leads to body inflammation too. We at kitchen Cheetahs are very concerned about the majority of gluten-free products being marketed that base their formulas on starch and sugar. I'm sure you can figure out why.

The thing is, as a population, we generally know what we shouldn't be eating - but we eat it anyway. Why? Because it tastes good. Because it's easy. Because it's familiar. Because it's there.

The transition to eating healthy is made easier by eating healthy foods that are tasty, easy, familiar, and available. Sounds simple. Once educated, it is simple. I say, start with chocolate!

So have some fun and enjoy this guilt-free treat. Live on the edge and have some with breakfast!


Fully Loaded Chocolate Bombs Formula:

SMALL BATCH:

Chocolate Base:
170 grams (2 bars) Lakanto Zero-Sugar Dark Chocolate, chopped small
30 grams deodorized coconut oil
15 grams dark Dutch cocoa powder, sifted
1/4 + 1/8 t. intense sweetener powder, to taste (a mix of stevioside, monk fruit is good)

Flavorings (optional):
1/8 t. vanilla flavor powder
1/4 t. almond flavor powder, to taste
1/8 t. cherry flavor powder

Inclusions (about 1 1/2 c.):
80 grams (1/2 c.) roasted crispy whole almonds
60 ounces (1/3 c.) whole dried organic Bing cherries
35 grams (1/4 c.) dried organic sour cherries (sweetened has the best texture and taste)
35 grams (1/4 c.) organic raisins
20 grams (1/8 c.) cocoa nibs


LARGE BATCH:

Chocolate Base:
600 grams Lakanto Zero-Sugar Dark Chocolate, chopped small
100 grams deodorized coconut oil
50 grams dark Dutch cocoa powder, sifted
1 1/2 t. intense sweetener powder (a mix of stevioside, monk fruit & CitrusSweet is good)

Flavorings (optional):
1/2 t. vanilla flavor powder
1 t. almond flavor powder, to taste
1/2 t. cherry flavor powder

Inclusions (about 6 c.):
280 grams (2 c.) roasted crispy whole almonds
8 ounces (1 1/4 c.) whole dried organic Bing cherries
120 grams (1 c.) dried organic sour cherries (sweetened has the best texture and taste)
140 grams (1 c.) organic raisins
70 grams (1/2 c.) cocoa nibs


Method:

In a large microwave-safe bowl, melt the chocolate and coconut oil together, pausing and stirring every 30 seconds, until melted and warm. Mix together well.

Prepare one to two baking sheets by lining them with parchment paper or silicone mats and set aside.

Add the cocoa powder to the melted chocolate mixture and mix in well

Add the intense sweetener powder to taste and mix in very well. Taste for sweetness.

Add the flavor powders to taste and mix in well.

Add the inclusions and mix well.

Stir the chocolate occasionally as it cools until it starts to thicken up enough to hold a shape when mounded.

Portion the chocolate mixture onto the prepared baking sheets, in small mounds, using a spoon or a very small ice cream scoop.

Sprinkle the tops of the chocolates with sea salt before they set up, if desired.

Place the chocolates in the refrigerator until they are completely set up.

Store the chocolates in an air-tight container (in the refrigerator in the hot summer months).


Photos of the process:


Gather your ingredients.

Combine the chopped Lakanto chocolate and coconut oil.

Stir chocolate mixture every 30 seconds as it is melting.

Mix in the cocoa powder, intense sweeteners and flavor powders, to taste.

Start adding the inclusions.

Let any refrigerated ingredients come to room temperature before adding to the chocolate.


Stir the chocolate occasionally while cooling.

A silicone-lined baking sheet.

A parchment paper-lined baking sheet.
Drop chocolate mixture into little mounds.

A finished tray of chocolates.


Chocolates with a kiss of sea salt.
Beautiful Chocolate Bombs ready for packaging.


Enjoy,

Leila & Nancy.


Friday, May 1, 2015

Chai Spice Mug Cake - Sugar-Free, Low-Carb, and Gluten-Free. Y-U-M.

Here is another Amazing 2-Minute Speedy Cake!

2-Minute Chai Spice Jiffy Cake.

This is another delicious gluten-free cake recipe that is very similar to our Amazing Mini Gingerbread Speedy Cake. These make your kitchen smell heavenly!

I adore Chai Tea. I make some herbal caffeine-free versions of chai that our family loves and they have long been one of our favorite beverages... But I just cant seem to get enough Chai, so this mini cake was born.

This low-carb Chai-Spice mug cake is light and fluffy. It tastes terrific, plus it is packed with lots of nutritious ingredients, instead of using a high amounts of starch like the typical gluten-free baked goods. This unique Mini Cake fills you up and keeps you feeling satisfied for a long time, taking care of your cravings for sugary sweets. It's perfect paired with a cold glass of organic whole milk or almond milk.

We LOVE these Jiffy Cake recipes!

This is a variation of a recipe created in the Kitchen Cheetahs Test Kitchens in the fall of 2014. This delicious microwave mini cake cooks in only 2 minutes. It's nice to make just a little cake and not have a bunch of leftover cake you don't know what to do with.

We like to prepare several of these single-serving cake mixes and package them up into mini zip-lock bags. The ingredient list is more complex, but it is totally worth getting out all of these ingredients to make these cake mixes. Then they are ready for a quick dessert, breakfast, or snack. Often 2 of us will share 1 of these scrumptious cakes. They are very filling and enjoyable to eat. These quick mini cakes are great for people who don't want to be deprived on their low-carb or gluten-free diets, and still want to lose weight.

These are truly a guilt-free treat. I feel completely comfortable having my family eat these for breakfast, or as a snack before bed. This is sugar-free, gluten-free, chemical-free, and dairy-free. It also has a nice protein content and is loaded with healthy fiber. The coconut oil is very good for you too.


Stay tuned, more delicious speedy mini-cake recipes will be posted on this blog!


MINI CHAI SPICE SPEEDY CAKE Recipe:

Dry Cake Mix Ingredients:

3 T. finely ground white almond meal
1 T. plus 1 t. coconut flour
1 T. finely ground golden flax meal
2 t. finely ground rice bran or oat bran
1 T. xylitol
1 T. IMO powder
1 T. Lakanto brand White Zero-Calorie Natural Sweetener (sugar substitute)
1/16 t. (heaping) lecithin powder


1/2 t. baking powder
1/4 t. plus 1/8 t. ground cardamom, to taste (I love cardamom)
1/4 t. ground cinnamon
1/4 t. ground cloves or allspice
1/4 t. ground ginger (make sure your ginger powder is fresh)
1/8 t. powdered intense natural sweetener, of choice (we will post a formula for soon!)
1/16 t. (heaping) sea salt or Biosalt (recipe on this blog)


Wet Ingredients:

1 large egg, at room temperature
1 t. vegetable glycerine
2 T. warmed coconut oil
2 T. warm water
1/2 t. real vanilla extract, optional


Method:

To Make The Dry Cake Mix:

Place the first 8 ingredients in a Krups seed mill and finely grind together. The finer this is ground, the nicer the cake will turn out.

Pour out the fine powder mix into a small zip-lock bag.

Add the rest of the dry ingredients into the zip-lock bag.

Seal the bag and shake together well to blend.

Repeat this process for however many cake mixes you choose to make.

Label and store the bags of cake mix in your refrigerator, or in your freezer for longer term storage.


To make 1 mini-Cake:

Oil a 2-cup sized Pyrex baking cup (we like to use deodorized 76 degree coconut oil).

Crack the egg into the 2-cup Pyrex baking cup and whisk to blend without incorporating air.

Add the vegetable glycerine and vanilla and whisk together.

Add the warmed coconut oil along with the warm water, whisk together well to blend.

Pour in a single serving of prepared dry Mini-Cake Mix. Stir together until smooth.

Place the Pyrex baking cup off-center in your carousel microwave for even cooking.

Cook on high for 2 minutes in the microwave. The center of the cake should just spring back when touched.

Let cake cool in the microwave 3 minutes.

Remove from microwave and eat once it has cooled down enough, or cover with a lid to keep moist and eat it later.

You may sprinkle the top with additional cinnamon or chai spices. Topping with whipped cream is excellent too!

Enjoy!


Variation: To Make a mini-cake that you can turn out of the baking cup:

Cut out a piece of parchment paper that fits neatly into the bottom of your Pyrex baking cup.

Oil the bottom and partway up the sides of the Pyrex baking cup. Place the parchment paper disk in the bottom of the baking cup and press to attach.

Oil the top of the parchment paper in the baking cup.

Mix up your cake mix in a separate small bowl and scrape it out into your oiled and papered Pyrex baking cup.

Microwave 2 minutes, as directed above. Cool 3 minutes in the microwave.

Remove from microwave and then invert cake onto an oiled serving plate. Peel off parchment paper.

Let the cake cool an additional 3 minutes before eating, or cover for later.


Source: VitaFiber IMO (Isomalto-oligosaccharide) fiber powder http://www.bioneutra.ca/product_vitafiber.htm


Photos of the process:


An easy way to store and warm the coconut oil for Jiffy Cakes.


Mix the wet ingredients together and them add the dry ingredients (I used a pre-made mix).


Mix together well until lumps are removed.

Microwave off-center 2 minutes, for even cooking.

The finished cake.

Sprinkle the top with cinnamon or chai spices if desired. You can top with whipped cream too!


A very nice textured cake.


Enjoy!

Leila & Nancy
The Kitchen Cheetahs!