Showing posts with label Main Dish. Show all posts

Tuesday, March 22, 2016

Tender Flavorful Beef Carnitas - Clean Eating, Paleo, Gluten Free

Shredded Beef Carnitas served over top a fresh Mexican salad.

These Beef Carnitas are very tender and mildly sweet and spicy. If you use raw or fresh (not cooked or pasteurized) pineapple juice, it will tenderize your meat further by the bromelain content that pineapples contain. This recipe is very similar to my Pork Carnitas, I just added a bit more garlic to the beef version. See my Pork Carnitas recipe on my other blog called BeauteandtheFeast.blogspot.com.

You can make these carnitas in advance but it is super easy to make 4 hours before you plan on eating dinner. You will have a lot of leftover meat, unless you are feeding quite a large family. The left over meat is perfect for filling chimichangas, burritos or tacos, or use in a Mexican-style casserole, or as a Mexican salad topper, ... Yum.

What I love about meats that have been simmered in well-flavored broths or sauces, is that it usually keeps the meat from tasting oxidized when the meat is reheated as leftovers. Oxidation is prevented by the use of herbs and spices. Adequate salt in the cooking liquid helps all the flavors to permeate the meat, bringing the flavor throughout nicely. Reheating the meat on the stove instead of in the microwave keeps the leftover meat tasting fresh.

I am one of the unusual (weird?) people who can taste that oxidized off-flavor in meat. Rarely have I ever met people who can taste that like I can. It's been really annoying actually, because I can't stand leftover roast beef, chicken (strangely, Costco's rotisserie chicken, boned and packaged air-tight has tasted great), turkey (bleh, although brining it with herbs has helped), pork, let alone game meat. Microwaved meat is the worst! I see other people enjoying their leftover reheated whatever, and I can't eat it with out feeling sick, and I have to pick the meat out. It makes it hard for me to get the protein I want. I can usually eat meat if its freshly prepared with out a problem, unless it's old, improperly stored meat. Believe it or not, I do not like being a vegetarian. I will eat that way a lot, but I listen to my body in it's requests for good meat. It took me until I was in my late 30's to even figure out what that yucky "taste" was. I was doing research on professional food manufacturing and how a company was attempting to deal with the off-flavors of oxidized meat, extending it's shelf life. I found out I wasn't crazy after all....I'm just a "Super Taster." I should have a Super Hero cape made for that.

On to the recipe...


Beef Carnitas Recipe:

2 t. chili powder (gluten-free)
1 t. ground cumin
1 t. BioSalt or sea salt
1/2 t. onion powder
1/2 t. garlic powder (or granulated garlic)
1/2 t. fresh ground black pepper
3 to 4 pound beef roast, fresh or thawed
1 to 2 T. deodorized coconut oil
24 ounces unsweetened pineapple juice (can use 6 oz frozen concentrate plus 18 oz water)


Method:

Preheat your oven to 300 degrees F.

Mix the spices and salt together. Rub onto the entire surface of the meat.

Heat a large dutch oven (with a tight-fitting lid) on medium-high, add the coconut oil and sear the roast on all sides until brown, about 2 minutes per side.

Pour the pineapple juice over the roast, cover and place in the preheated oven for about 4 hours, or until the meat is fall-apart tender.

Shred the meat in the pot with 2 forks, stir into the juice and cover to keep warm.

Use in your favorite Mexican-style recipes.


Photos of the process:


Rub all sides of the roast with spice mixture.

Brown all sides of the seasoned roast in deodorized coconut oil in a dutch oven


Pour the pineapple juice over top and place on the lid.

Bake tightly covered at least 4 hours, until fall-apart tender.

Shred the Meat once it is fall-apart tender

Stir the shredded meat into the juice.

Serve hot with your favorite Mexican meal (this salad is dairy-free and grain-free).


Enjoy,

Leila.

Saturday, January 9, 2016

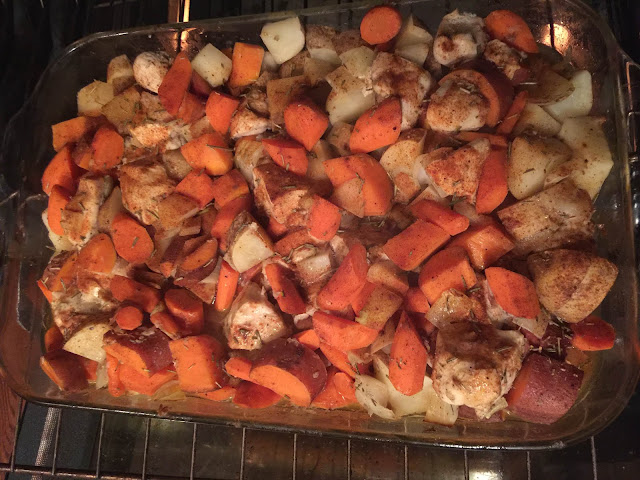
Rosemary Roasted Chicken & Winter Vegetables


This is pure comfort food. It warms you thoroughly on a cold winter's night and makes enough to feed at least 6 hungry people.

The chicken is juicy and perfectly seasoned. The roasted vegetables are buttery and tender and compliment the chicken nicely. The sweet potatoes add a delicious touch of sweetness and the rosemary's fragrance perfumes the whole dish. This is a satisfying meal that will be enjoyed often.

This easy meal is inspired by our EASY JUICY ROAST CHICKEN recipe also on this blog.


One Dish Roast Chicken & Vegetables:

Serves 6

4 large organic chicken breasts, brined and cut into large chunks
2 T. deodorized coconut oil for oiling the baking pan
1 onion, cubed
10 to 12 organic carrots, peeled and cut into chunks
3 large organic russet potatoes, scrubbed and cut into chunks
1 to 2 large organic sweet potatoes, scrubbed and cut into chunks
4 large garlic cloves, peeled and mashed with 1/2 t. sea salt
1/2 cup melted organic butter or ghee
1 t. seasoned salt
1/2 t. fresh ground black pepper
1/2 t. onion powder
1 t, dried rosemary, crumbled
Sweet paprika, to sprinkle on top as a garnish


Method:

Thaw and brine skinless, boneless chicken breasts in water that has 2 T. sea salt dissolved into it. Let the meat soak completely covered in the brine 30 to 45 minutes. Rinse and cut meat into about 2-inch x 2-inch chunks. Set aside.

Oil an extra large casserole dish with deodorized coconut oil (otherwise you will taste coconut).

Wash and prepare the raw vegetables and place in the oiled baking dish.

Place the raw chunks of chicken on top of the raw vegetables. Sprinkle the meat with the seasoned salt and onion powder. toss the meat to coat with the seasonings evenly.

Sprinkle pepper and rosemary over everything in the baking dish.

Mash the garlic with the salt.

Melt the butter, then add the mashed garlic. Pour the garlic butter over top and toss everything together well to evenly coat.

Sprinkle with paprika and dot with more butter, if desired.

Cover with foil and bake at 350 degrees F, for 60 minutes.

Uncover, toss, and bake an additional 15 minutes at 400 degrees F.

Serve hot with a fresh green salad and fruit on the side. Have seasoned salt at the table too.


Note: For a dairy-free version, replace the butter with a total of 1/4 c. deodorized coconut oil.


Enjoy, 

Leila.

Sunday, November 15, 2015

Family Style Chili - A much better copy-cat of Stagg Classic Chili! Plus a note about nightshades...

Family Style Chili

This makes a big pot of delicious chili that is great to serve at family gatherings. It can easily be made ahead and reheated if needed. The flavor is well-rounded yet mild enough that kids love it too. Our recipe is reminiscent of a commercial brand of chili called Stagg Classic Chili. Homemade is always better, and this chili is no exception. I did not set out to re-create Stagg's chili, it just happened.

Our recipe is easier to digest than some chilis, and is nice and tomato-ey as well. It is also less acidic than most tomato-based chilis, due to a touch healthy sweetener being added.

Note that green peppers assault some people's taste buds. If you are one of these people or have a family member who is, just replace the green pepper with a red bell pepper, or even a yellow one. Green bells are technically unripe anyway, and are the most bitter tasting of the three. Red bells are usually the sweetest.

Goji berry bush
Bell peppers are also a member of the nightshade plant family, and some people are sensitive to that, if so, omit the bell peppers (and the tomatoes for that matter!). By sensitive, I mean, some folks experience arthritic-type symptoms when they consume members of the night shade family. Maybe I should just call this nightshade chili! Uh, OK, don't eat this chili if you want to avoid vegetables from the nightshade family.

Other members of the night shade family are: chili peppers (all), potatoes (not sweet potatoes or yams), tomatoes, tomatillos, eggplant, goji berries, cape gooseberries... Just so you know.


Cape Gooseberry fruits

So, back to the chili recipe! It makes a hearty, delicious meal and I think you will love it.


Family Style Chili Recipe:

2 pounds organic ground beef or turkey
1 medium onion, diced small (about 1 cup)
3 stalks celery, diced small (about 1 cup)
1 green bell pepper, diced small (about 1 cup)
3 cloves garlic, smashed with some of the salt
1 1/2 T. chili powder, to taste
1/2 t. cumin powder
1/2 t. garlic powder
2 15-ounce cans organic kidney beans, undrained
1 15-ounce can organic great northern white beans, undrained (or a 3rd can of kidney beans)
1 6-ounce can organic tomato paste
1 28-ounce can organic diced tomatoes
1 15-ounce can organic crushed tomatoes
1 cup organic chicken stock
1 t. organic beef base
1 c. purified water
3 T. Golden Lakanto zero-cal sweetener or organic coconut palm flower sugar (replaces brown sugar)
2 t. sea salt or BioSalt, to taste


Method:

In a soup pot, saute the ground beef with the onion, celery, green pepper, and garlic until the vegetables are tender, breaking up the meat and stirring frequently.

Add the remaining ingredients, mixing together well.

Simmer, covered for about 90 minutes, to blend the flavors well.

Check for seasoning and adjust if needed before serving.


Serving Ideas:

Serve over buttered and seasoned baked potatoes for a gluten-free meal.

Serve over steamed and buttered summer squash for a low-carb meal.

Serve in a bowl with gluten free organic corn chips, cheese, and sour cream on top.

Serve with homemade organic corn bread and raw honey butter.

Serve over homemade gluten-free macaroni and cheese.

Serve over steamed tamales.

Serve in a bread bowl topped with cheese.

Serve any way you please!


Photos of the process:


Enjoy,

Leila.

Monday, October 12, 2015

Favorite Rosemary Lemon Chicken - Italian Restaurant Copy-Cat

Rosemary Lemon Chicken
Flavor-packed Rosemary Lemon Chicken that is better than any restaurant! 

This recipe is now one of our family favorites. It is so juicy and bright tasting. It's also easy!

My daughter Naomi is a foodie too. She was inspired last month to make this dish. She felt like creating a zippy skillet chicken featuring rosemary and lemon. I offered her the ideas of adding fresh garlic, brining the meat beforehand for more rosemary flavor, and making a tasty glaze at the end. I let Naomi take the lead on this one, which was fun. I brined the meat. she cooked and seasoned it, then I made the final glaze, with her watching me so I could teach her how to do it. She seasoned it perfectly (proud mom smiling). I have told all of my children that a secret to being a great cook is just knowing what good food tastes like! It's kinda like knowing your destination before you get there, so then you will know when you have arrived.

Glazed Rosemary Lemon Chicken
We made this dish again together last night. Naomi says we have to put this on our blog, and I definitely agree. So now I'm sharing our recipe with you!

I highly recommend brining your chicken, so plan ahead a bit. Fresh rosemary is wonderful here, although dried will work OK. If you must use dried rosemary, boil your 1 cup of water and pour it over the rosemary, cover and steep like you would when making an herbal tea. This will infuse your chicken with a stronger rosemary flavor more quickly. This dish is supposed to have a big hit of rosemary. YUM.


Rosemary Lemon Chicken Recipe:

Serves: 6

BRINE:
1 c. hot water
2 T. sea salt
1 t. Lakanto sweetener (erythritol + monk fruit)
1 clove garlic, smashed into a paste with some of the sea salt
20 grinds black pepper
1 t. fresh rosemary leaves, smashed with some of the sea salt
cold water, to cover the chicken

CHICKEN:
6 skinless boneless organic chicken breasts, thawed
2 T. organic butter or ghee
2 T. deodorized coconut oil
4 cloves garlic
1/2 lemon, juiced
2 sprigs fresh rosemary
1/2 t. lemon pepper seasoning
1/4 t. dried basil

GLAZE:
1/2 c. water
1 t. organic chicken base
1 t. tapioca starch
1 T. butter, optional

GARNISH:
Rosemary sprigs
Thin sliced lemon


Method:

BRINE:

Dissolve the sea salt and Lakanto sweetener into the cup of hot water. Add the garlic, rosemary, and black pepper. Stir together and let steep together a few minutes while you prep the chicken meat.

Thaw the chicken meat and trim off any excess fat. Place in a large shallow bowl.

Pour the salt water mixture over the chicken. Add enough cold water to completely immerse the meat. Let the chicken marinate in the brine for 2 hours. May also marinate in a large (1-gallon) zip-lock bag.

CHICKEN:

When you are ready to cook the chicken, remove chicken from the brine and let drain. Heat the butter and coconut oil in a large skillet over medium-high heat. Add the 4 cloves of smashed garlic and place the chicken in the pan. Lower the heat to medium.

Squeeze half of the lemon juice over top and sprinkle with half of the rosemary, which has been stripped off it's stem. Sprinkle the chicken with the lemon pepper and basil.

Cook uncovered until the chicken starts to look golden brown underneath.

Flip the chicken over and sprinkle with the remaining rosemary leaves. cook until golden brown on the other side. Check meat to make sure it is cooked through (you should see no pink in the center).

Remove the meat to a serving platter and set aside. Leave the drippings in the pan.

GLAZE:

For the glaze, mix the chicken base and tapioca starch into the 1/2 cup water.

Heat the frying pan with the drippings to medium-high. Pour the starch mixture into the pan and whisk until thickened and bubbly. Add additional butter, if desired.

Squeeze the rest of the lemon juice over top the glaze and whisk in. taste for seasoning.

Pour glaze over the hot chicken and serve immediately.

Garnish with fresh sprigs of rosemary leaves and lemon slices if desired.


NOTES:

If your frying pan is too small, your meat wont brown because too much moisture accumulates. If this happens, just cook the meat on both sides until completely cooked through. Transfer 3 breasts at a time to a new fry pan of sizzling butter and quickly brown on both sides. Repeat with the last 3 breasts. Scrape the leftover butter into the pan with the rosemary drippings and continue on with making the glaze.

You may add the zest from the half lemon, if desired (use an organic lemon for this).

The brined chicken stays very moist and does not need additional salt added. It is forgiving if you accidentally over-cook it. Make sure that you have added enough fresh lemon juice at the end. The flavor should be robust with rosemary, yet bright from the citrus, and not too tart.


Photos of the process:


ENJOY!

Leila 

Tuesday, September 29, 2015

Crazy Good Vegetarian Taco Meat (Nut-Free, Gluten-Free)

Crazy Good Vegetarian Taco Meat
Meaty, savory, chewy & perfectly salty - that's what this taco meat is! This is a new favorite recipe of ours!

A couple of my daughters took a road trip to go visit my parents. Lucky them, they got to eat grandma's food! My mom created this terrific vegetarian meat substitute on the 25th of this month. Mom will flavor this meat various ways. This recipe is for a taco meat flavor, and it is SO GOOD.

My daughter Lexi has been a vegetarian for a few years. Lexi has recently introduced a little meat to her diet, but is still generally vegetarian. As long as she remains healthy, we support her in her choice. Grandma and Lexi created this recipe together, so it is now officially named "LexiBurger".

This meat is high protein from the tofu and egg, and high fiber due to the perfectly chewy brown rice. You do not need to tell your family that they are eating tofu, because you cant tell it's in there! Freezing extra-firm tofu is a trick our family has used for years. When you thaw it and press the excess water out, it has an awesome meaty texture when you crumble it. Just buy some extra-firm tofu and throw it in your freezer just for this purpose.

The egg helps to bind everything together perfectly, just so you know.

Are you wondering what the "Umami" is mentioned below??? It's another flavor profile that they know about in Japan. It gives amazing full-bodied, rich, complex flavors to savory foods. MSG enhances umami, for example. Umami flavors are found in slow-roasted stews, and sauces made with fond which have been reduced to concentrate the flavors, mushrooms, soy sauce, Worcestershire sauce, etc. It's a mysterious flavor that you can't quite put your finger on, but you really notice when it's there because the food tastes so amazing, you just want to stuff your face! Look "umami" up online for a more detailed description.

Put this delicious taco "meat" in tacos, burritos, with or without re-fried beans and cheese, on top of nachos, or on top of a taco salad. Lexi brought some of this meat to my house and we made nachos for a tasty filling treat. YUM. I have pictures of our nachos in this post.

 Look at this meat, it tastes even better than it looks!

Crazy good vegetarian taco meat nachos.


Vegetarian Lexi Burger:

1 package organic extra-firm tofu
1 1/4 to 1 1/3 c. chewy cooked organic short grain brown rice
1/4 to 1/3 c. soaked chopped dried onion
2 T. rice oil
1 T soy sauce (Tamari for gluten-free)
1 to 2 T. hot taco sauce, to taste
2 t. sunbutter (sunflower seed butter), up to 3 t., for richness
1 small beaten organic egg
2 t. organic paprika (or ground chili)
2 t. onion powder
1/2 t. garlic salt
1/2 t. mushroom powder (to add full-bodied complex "Umami" flavor)
1/4 to 1/2 t. cumin powder
Chipotle powder, to taste
1/2 c. or more deodorized coconut oil, for browning the mixture.
Fresh ground pepper, to taste
Seasonall seasoned salt, to taste
Garlic salt, to taste
1/2 c. more cooked rice, if needed


Method:

Do ahead of time:

1.  Slice and freeze the box of tofu for at least 24 hours. THAW. Press firm to remove excess water and crumble finely.

2.  Cook the short grain brown rice only until it's nice and chewy, then chill at least overnight for best results (over-cooking makes the rice mushy).


The day of making the Vegetarian Taco Meat:

Mix the crumbled tofu with the 1 1/4 to 1 1/3 c. cooked brown rice and soaked dried onion flakes in a medium mixing bowl.

Add the rice oil, soy sauce, hot sauce, and sunbutter, and toss well to combine.

Add the beaten egg and toss well to coat completely.

Toss with the paprika, onion powder, garlic salt, mushroom powder, cumin, and chipotle.

Heat 1/2 c. coconut oil in a large skillet, when starting to sizzle, dump in the tofu mixture and stir-fry it like you would fried rice. You want to brown it a little, but do not over-brown or it can get a little dry. Add more oil if needed.

Season to taste with pepper, Seasonall, garlic salt, etc.

If the vegetarian meat mixture turns out too rich and oily, just work in another 1/2 cup or so of cooked rice.


For the nachos, we melted cheddar and jack cheese over gluten-free tortilla chips. Topped the nachos with the warm "meat mixture, drizzled on salsa and topped with a dollop of sour cream. I was too lazy to go get a can of olives, but we would of loved some along with fresh guacamole!


Enjoy, 

Leila & Nancy.

Sunday, September 27, 2015

Kettle Turkey Pot Roast - Copy Cat Chuck-A-Rama Recipe

Kettle Turkey Pot Roast
Imagine tender chunks of savory turkey that fool you into thinking you are eating slow simmered roast beef! 

I LOVE this recipe. My family loves this recipe. I think you will love it too.

Chuck-A-Rama does a great job of making their kettle turkey pot roast. Have you had it? It's by the roast beef, you must try it. It tastes like very tender roast beef with yummy carrots and potatoes, swimming in a tasty broth.

I have also had another version of this at a restaurant I can't remember the name of, that was equally delicious. This version version had a delicious thicker gravy and a ton of black pepper - zowie! A bit much for tender mouths. Chuck-A-Rama's Kettle Turkey has a much thinner brothy sauce that is delicious, but makes a lousy gravy, since it just runs off everything.

I decided it was time for me to recreate a version at home that is the best of both worlds. I wanted a thicker gravy-like sauce that wasn't quite so peppery. I wanted the big chunks of tender fall-apart meat. I wanted it to taste beefy, not like turkey. And I wanted lots of carrot and potato chunks too.

I'm thrilled with the results and my family loves it. I created this recipe around 2008,and I have made it when ever I see turkey thighs being sold at my local market. It's great that you do not have to thaw the meat first. This recipe is very forgiving, as you will see with the 2 variations I have listed below the recipe.


Crock Pot Turkey Pot Roast:

1 large onion, diced into cubes
2-3 turkey thighs (about 3 to 4 lbs, frozen)
1 t. seasoned salt, to taste
60 grinds fresh black pepper
2 cloves garlic, mashed
1 envelope dry Lipton Onion Soup Mix
1-2 t. organic beef base
1/4 c. sherry cooking wine, optional
1 t. Worcestershire sauce
1/2 t. Herbs de Province
1 bay leaf, optional
2 3/4 c. water
1 3-ounce package brown gravy mix (or mushroom)
12 carrots, peeled and cut into big chunks
6 to 8 potatoes, peeled or unpeeled, cut into big chunks
4 to 6 ribs celery, cut into big chunks, optional


Method:

Place the cubed onion in the bottom of a large oval shaped crock pot.

Season the frozen or thawed turkey thighs with seasoned salt and pepper. Place in the crock pot on top of the onions.

Add to the crock pot the garlic, onion soup mix, beef base, sherry, Worcestershire, Herbs de Province, bay leaf, and water.

Cover and cook 3 or more hours (until the meat is fall-of-the-bones tender).

Lift meat out of the crock pot and remove skin and bones, leaving big chunks of meat. Set aside.

To the crock pot add the package of brown gravy mix. Stir to combine with the hot liquid remaining in the crock pot.

Add all of the chunked carrots, potatoes, and celery to the crock pot. Toss to coat with the sauce.

Return the boned turkey to the crock pot. Lay the meat on top and gently spoon some of the sauce over top.

Place lid on crock pot and cook another hour or so, until the vegetables are tender.

Add more water as desired. Check for salt before serving.


Alternate Methods:

Alternate Method # 1 (Use this if you want to cook the meat ahead of time, my favorite method):

Right before you go to bed: Place the diced onions in the bottom of the crock pot. Lay the frozen turkey thighs on top. Season the meat with the salt and pepper. Pour in about 1 cup of water and put on the lid. Cook on low while you sleep. In the morning, remove the meat and remove the skin and bones and set aside. Mix the rest of the ingredient listed together, tossing the vegetables well to coat. Lay the big chunks of turkey on top. Spoon sauce over the meat. Cover and cook on lowest setting until the vegetables are tender. Add water as desired. Taste for salt before serving.

Alternate Method # 2 (use this method is you are going to be gone all day):

Dump all of the sauce ingredients and into the crock pot, starting with the water, onion soup mix, brown gravy mix, beef base, sherry, Worcestershire sauce, Herbs de Province, bay leaf, onions, and garlic. Stir well. Season the frozen or thawed turkey thighs with the seasoned salt and pepper and nestle into the sauce, spooning sauce over top. Lay all the vegetable chunks on top. Cover and cook on low until meat is tender. Remove the meat and skin and de-bone. Place back into the crock pot and gently stir before serving.


Moki is hoping for a turkey treat! Please mom???
Moki has been such a good patient boy...


Enjoy, 

Leila