Thursday, February 12, 2015

Gluten-Free Buffalo Meatballs with Cream Sauce

Buffalo Meatballs

When our family raised buffalo (yes, you read that right), this is one of the recipes my mom created using their lean flavorful meat. This dish is even better reheated. The meatballs are tender and the creamy sauce is rich and flavorful.

If you don't want to hunt down buffalo, you can make the meatballs with a combination of 12 ounces ground beef and 4 ounces ground pork.


BUFFALO MEATBALLS Recipe:

Meatball Mixture:

1 large egg
1 c. soft bread crumbs, not packed (or for a GF version replace with 2 T. potato flakes)
2 T. purified water
1 lb ground buffalo meat
2 T. olive oil
1 t. Worcestershire sauce (gluten-free)
1 small garlic clove, smashed well
1/2 c. minced onion
Several gratings fresh nutmeg
1/2 t. sweet paprika
1/2 t. sea salt or BioSalt (recipe on this blog)
Lots of fresh ground black pepper, to taste


Simmering Sauce:

Gluten-free flour for dredging meat balls (recipe on this blog)
1 T. bacon fat plus 1 T. clarified butter (or 2 T. butter)
3 to 4 c. beef or poultry stock (seasoned to taste)
A blend of 50% gluten-free flour and 50% tapioca starch, for thickening
1/2 c. Heavy cream


Method:

In a large bowl, mix the egg, water and instant potato flakes or bread together.

Add the buffalo meat and the rest of the meatball ingredients to the egg mixture.

Mix and squish the meatball mixture together with your hands (wear food-safe gloves if desired).

Shape into 1 1/2-inch sized meatballs.

Dredge in gluten-free flour.

In a large, deep frying pan, brown the meatballs in a mixture of 1 T. bacon fat and 1 T. clarified butter (or 2 t. butter).

Cover browned meatballs with 3 to 4 c. of beef or poultry stock.

Cover and simmer very gently for 1 hour.

Thicken the stock with a mixture of water and the GF flour/tapioca starch mix, to make a gravy.

Pour in heavy cream and stir to blend. Check seasoning and adjust if needed

Remove from heat and let cool, then chill overnight.

When ready to serve, gently warm the meatballs in the thickened sauce.

Serve over brown basmati rice, gluten-free noodles, or seasoned mashed potatoes.


Note: 

Using gluten-free bread in place of regular bread does not work. Don't do it. You could try using up to 1/3 c. homemade mashed potatoes if you want to, or some soft cooked brown rice or warm quinoa for more texture. I have not done this, so if you try it, let us know how you liked it.


Tip:

If you don't have buffalo or beef broth ready, in a pinch you may use water plus a high quality organic Beef Base. I did it and it worked out great. I added a touch of sherry to the sauce, along with a little onion salt, garlic powder, and a shaving of nutmeg.

The pictures of making this dinner:


Starting the meatballs

Hand mixing the meatballs

Meatballs in the frying pan

Steaming some carrots for the side

The meatballs are almost done

Adding frozen baby peas to the nearly done carrots
Removed finished meatballs from pan
Making the sauce


Adding the meatballs to the simmering sauce

Warm the meatballs through

Meatballs and sauce ready to serve

The veggies are done steaming
A rice cooker makes perfect rice
Jasmine rice ready to go

Dinner is ON - Buttered peas & carrots, Jasmine rice, and the meatballs

YUM.


Enjoy,

Leila

Easy Juicy Roast Chicken - Better than Costco's Rotisserie Chicken! (Copy Cat Costco Rotisserie Chicken)

The Best Easy Roast Chicken (Gluten-Free)
Easy Juicy Roast Chicken

This really is the best roast chicken ever. Every time company has this chicken, they rave about it. Every time our family has this chicken, we rave about it.

It has been one of our families favorite meals for years. It blows Costco's Rotisserie chickens away - Just sayin'...

Yes, it does take longer to prepare than the time it usually takes to go to Costco and pick up a chicken, but this chicken is far more Delicious and the texture of the meat is superior. Plus you have to prepare the rest of the meal anyway.

Once you taste this recipe, you will crave it and want to make it again and again. Like my daughter said when she first tasted it, "Where have you been all my life?!"


Tip: You may use this roast chicken in my Copy-Cat Costco Rotisserie chicken Salad Recipe!


Easy Roast Chicken Recipe:

1 roasting chicken, rinsed and patted dry
1 large onion, cut into chunks
garlic powder
fresh ground pepper
sweet paprika
onion powder
butter, melted (and/or deodorized coconut oil)
McCormick Season All seasoned salt (make sure yours is gluten free)

Optional: Bake some potatoes and small yams at the same time.


Method:

Peel and cut into chunks 1 large onion.

Rub the inside of the chicken cavity with garlic, pepper, paprika, and onion powder.

Fill the chicken cavity with the onions and sew up with a needle and white string, or skewer closed.

Rub the outside of the chicken all over with melted butter and/or coconut oil (butter = best flavor).

Sprinkle the outside very generously with the seasoned salt (McCormick or Laury's).

Place the chicken on a rack placed in a shallow roasting pan.

Bake the chicken in a 350 degree oven for about 1 1/2 to 2 hours, basting with the drippings several times. Baste the chicken about every 20 to 30 minutes, increasing in frequency as the chicken is almost done roasting. Be careful not to puncture the chicken's skin. The chicken will become a beautiful crispy golden brown.

If you are baking potatoes at the same time, I like to scrub the skins, pierce the skins well with a fork, an place them in the roasting pan along side the chicken. Baste them every so often with the chicken drippings.

Scrape up all the drippings and pour into a small serving bowl with a ladle.

Serve the chicken with the roasted onions and drippings on the side, along with the baked yams or potatoes if you prepared them.

The drippings are amazing drizzled all over the meat, onions and potatoes. Have extra seasoning salt and a pepper grinder at the table. Add a fresh salad and you're good to go!


Tip to speed cooking time:

Roast the chicken in a 400 degree oven on the bottom shelf for 30 minutes. then turn the oven down to 350 degrees. If the drippings start to burn, raise to the middle shelf


Variation:

Live on the edge and roast your chicken upside down! 

Why? The skin on the breast side is thin and dries out easily. The skin on the back has more fat under it and it will literally baste your chicken for you! Your chicken will be super moist and have a gorgeous crispy skin, almost like Peking Duck. I like the flavor of the basting juices, so still baste the chicken 1 to 2 times while roasting, but that's it. It makes the Easy Roast Chicken recipe even easier!


Tip to make even juicier:

Place your chicken breast side down in a large porcelain-lined, heavy cast iron pot or kettle. Roast in the oven, uncovered if you want a crispy skin. The sides of the pot help hold the moisture in the meat better.


Note: My dad loves Old Bay Seasoning used as the seasoning salt.


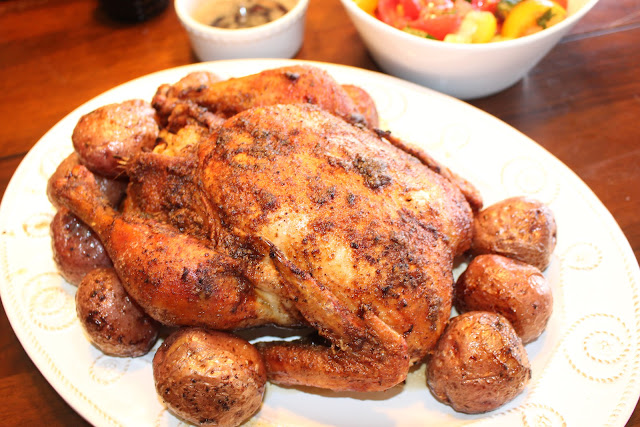
A beautiful Juicy Roast Chicken - Stuffed with onions.

Red New Potatoes were baked along side the chicken.

Delicious chicken, potatoes & onions drizzled with drippings & heirloom tomato salad on the side.


Enjoy!

Leila


Decadent Low-Carb Chicken In Velvet Recipe

Chicken In Velvet

Chicken In Velvet
A luxurious recipe, definitely fit for company, but easy enough to prepare anytime. The flavors are wonderful here, and the texture? Velvety - of course!

This also happens to be low-carb! So enjoy!

This is one of my mothers original recipes that she created when she entered a cooking contest for the best unique chicken recipes. She was one of the few selected to compete. she submitted several of her recipes to increase her chances, but they only were choosing 1 recipe for the competition. I remember her excitement at being chosen, and her comment that they chose her least favorite of her submitted recipes, instead of her best ones. She prepared - she cooked - She didn't win. Of course, WE thought she should of won. Oh well... She won a chicken cook book for her efforts. I still have the book in my recipe book collection somewhere.


CHICKEN IN VELVET Recipe:

Serves; 4
Difficulty Level: Easy

Ingredients:

Chicken:

4 skinned and boned chicken breasts
1/4 c. Cognac (Brandy)
2 t. coriander seed powder
1/4 t. garlic powder
1/4 t. fresh ground white pepper
Butter, for browning chicken

Sauce:

1/4 c. condensed chicken broth (homemade stock, boiled down to about half it's volume)
1 c. heavy cream
Garlic powder, to taste
Cardamom powder, to taste
Sea salt, to taste
Tapioca starch mixed in a little water, to thicken sauce.


Method:

Marinate the 4 skinned and boned chicken breasts in the 1/4 c. Cognac, coriander, 1/4 t. garlic powder and white pepper for a few hours,or overnight.

Gently pound the marinated chicken breasts into paillards.

Saute the chicken gently until golden on both sides in butter and add the chicken marinade at the end to loosen the browned bits in the pan. Bring back up to a simmer.

Remove the cooked chicken and set aside.

Add the 1/4 c. condensed chicken broth and bring back up to a simmer.

If the chicken broth is not condensed, boil down the broth mixture until condensed to about half.

To the sauce, add the 1 c, heavy cream, garlic to taste, and cardamom to taste.

Thicken the sauce with the tapioca starch and water slurry.

Put the chicken back in the pan with the sauce and warm through.

Serve hot.


Note: This dish is very good served with Peas-and-Pearl Onions, and Cinnamon Rice Pilaf.


Enjoy your gourmet meal!

Leila


Delicious, juicy make-ahead turkey burgers (Low-Carb)

Turkey Tofu Burgers

Turkey Tofu Burgers on the grill.
These burgers have a delicious flavor and a nice tender and moist texture. My mom came up with this recipes over 10 years ago, and it's a good one! These are much better than the typical turkey burger (which I really do not normally care for).

A handy recipe where you can make several portions ahead of time, and have them ready in your freezer for quick delicious meals later.

Cook them like you would any other type of burger, bake, pan fry, or grill, they are sure to please. Don't worry about the tofu - you do not taste it here!


TURKEY TOFU BURGERS Recipe:

Yield: 16 1/2-cup burgers (large adult sized)

Difficulty Level: Easy

Ingredients:

2 (14 to 16-ounce) packages extra-firm tofu
1 T. black pepper
2 T. Tamari soy sauce (gluten-free)
3 T. Bronner's Protein Seasoning
3 T. onion powder (not onion salt)
1 to 2 T. fine ground psyllium husk powder
1/2 t. smoke flavoring ("Mesquite" preferred), if desired
1/2 c. warmed coconut oil
1/2 c. cold water
2 pounds ground dark turkey meat


Method:

Freeze the 2 (14 to 16-ounce) packages extra-firm tofu for at least 24 hours. (Freezing makes the tofu more crumbly.)

Thaw the tofu, pour off the water and discard. Crumble the tofu into a large bowl.

Add to the tofu in the bowl, the pepper, Tamari, Bronner's Protein Seasoning, onion powder, finely ground psyllium husk powder, and smoke flavoring, if using.

Toss gently to mix well. Avoid "gooshing", which ruins the ground meat texture.

Stir in the 1/2 c. melted coconut oil and 1/2 c. cold water. Mix well together.

Add the 2 pounds dark ground turkey meat, mixing gently, without squishing, until everything is well combined.

Shape into patties (1/3 to 1/2 cup each).Store the formed patties, stacked in freezer bags.


To Cook:

Pan fry with a little coconut oil, bake, or grill until cooked through. Serve.


Enjoy,

Leila


Wednesday, February 11, 2015

Chinese Lion Head Meatballs - Low-Carb, Gluten-Free, Sugar-Free

Lion Head Meatballs 

These taste amazing! They are so flavorful, moist and tender. They are unique enough to serve to company and your family will love them too.

This is a traditional Chinese recipe that my mother revamped before 2005. She uses turkey, extended with tofu instead of pork and Tamari instead of soy sauce, which contains gluten. The high-fiber psyllium flakes bind the turkey and tofu together beautifully with out the need for wheat bread. The only change I made was to replace the 1 t. fructose she calls for for the 1 t. xylitol stated below.

These are very quick to put together. then let them simmer away.


LION HEAD MEATBALLS Recipe:

12 ounces Extra-firm tofu
3 T. Tamari (gluten-free soy sauce)
1.2 t. White pepper
1 t. Garlic powder
1 t. Xylitol
2 T. Mirin (wine)
1 T. Black sesame seeds
2 t. Sea salt or BioSalt (recipe on this blog)
2 T. Chopped dry onion
1 bunch Scallions, sliced thin
1/4 c. Fresh coarsely ground ginger root
1 T. Dark (toasted) sesame oil
1 T. Psyllium flakes (whole psyllium husks)
2 T. Melted deodorized 76 degree coconut oil
1 1/2 pound Ground lean white turkey meat
Large green cabbage leaves, blanched
4 c. boiling water


Method:

Put in a food processor and rough puree:
Tofu, Tamari, pepper, garlic, xylitol, and Mirin.

Then add:
Black sesame seeds, salt, dry onion, sliced scallions, grated ginger, dark sesame oil, melted coconut oil, psyllium flakes, and the 1 1/2 pounds meat.

Mix all together and then "goosh" together like meatloaf (mixing with your hands).

Form into tangerine-sized balls.

Wrap in large, blanched cabbage leaves (use 2 to 3 smaller leaves, if you don't have enough big leaves). Wrap burrito-style.

Place in crock-pot. Cover with 4 c. boiling water. Simmer 2 hours, or until meat is cooked through.


Variation: 
Place in a large stock pot. Cover with 4 c. boiling water. Bring to a boil, then simmer 1 hour.


Enjoy,

Leila

Tuesday, February 10, 2015

Herb Flax Crackers - The 7th in a series of excellent Raw Food recipes

Herb Flax Crackers


I am posting a series of RAW FOOD RECIPES created by my mother Nancy Glazier and her good friend Irene Hauver. 

Together, as raw food pioneers, they complied an amazing collection of unique recipes that they used in teaching a series of raw-food-living un-cooking classes. We have a selection of delicious raw food recipes big enough to fill an entire cookbook. I know, cool, right?

These recipes are amazingly tasty! This is doing raw food right. Most raw food recipes are seriously lacking in taste and texture - well, not this collection. These beautiful ladies don't do anything half way! We are excited for you to try them.


Herb Flax Crackers are very handy to have in your pantry for when you need a speedy lunch or get the munchies. They have a delightful crunch and are SO healthy for you! Spread with Sunnie Sour Cream (recipe on this blog), Sunny Hummus (recipe on this blog), or other spread of choice.


HERB FLAX CRACKERS Recipe:

Ingredients:

4 cups Flax seeds, soaked in 8 cups water 8 hours (do not drain)
1/2 Onion, quartered
5 cloves Garlic
2 cups Chopped fresh herbs (chives, dill, sage, basil, oregano, parsley, kale, spinach, etc.)
2 t. Sea salt
1/4 cup Fresh lemon juice


Equipment:

Blender (like a VitaMix)
Food dehydrator with Teflex sheets for drying the crackers on
Bowl and spoon


Directions:

Combine onions, garlic, fresh herbs, salt, and lemon juice in blender. Puree until smooth. place in bowl.

Add 2 cups of soaked flax seeds and 1 1/2 cups water to blender. Puree until smooth. Pour into bowl with herb mixture.

Repeat with 2 more cups of soaked flax seeds.

Pour remaining whole soaked flax seeds into bowl with herb mixture and sir well to combine flavors.

Spread 2 cups of batter 3/8-inch thick on approx 8 Teflex Food dehydrator sheets.

Dry in a food dehydrator at 110 degrees for 8 hours. Flip onto screen.

Dry 12 more hours until crisp. Break into large cracker-sized pieces.

Store crackers in a pantry away from sunlight, in air-tight bags or bins. Fills an 8-quart size Zip-lock bag.

These crackers keep and store well.


Tips: 

The idea is to add just enough water to the soaked flax seeds in the blender to make a rough puree. This makes for crisper, thinner chips instead of just chewing on flax seeds stuck together. Use enough water to make it blendable in your blender.

Do not add an excess of water to soak the flax seeds - add just enough to make the mass like a thick batter. Then you can add water if needed during the pureeing process in your VitaMix blender. it's not like when we soak nuts in lots of water.

My mom always adds a bit of Vitamin C powder to her chips. It keeps her chips fresher tasting for longer, plus it keeps the colors lighter and brighter. Start with adding from 1/4 to 1/2 t. Vitamin C.


Note: Do not add more than the 2 t. sea salt asked for in this recipe. All dehydrated chips and crackers taste saltier once dried, because they are condensed, concentrating the salt.


Recipe created by the Kitchen Cheetahs, Nancy Glazier & Irene Hauver.


Enjoy!

Author, Leila Wood.


Neat Loaf - The 6th in a series of excellent raw food recipes

Neat Loaf

I am posting a series of RAW FOOD RECIPES created by my mother Nancy Glazier and her good friend Irene Hauver. 

Together, as raw food pioneers, they complied an amazing collection of unique recipes that they used in teaching a series of raw-food-living un-cooking classes. We have a selection of delicious raw food recipes big enough to fill an entire cookbook. I know, cool, right?

These recipes are amazingly tasty! This is doing raw food right. Most raw food recipes are seriously lacking in taste and texture - well, not this collection. These beautiful ladies don't do anything half way! We are excited for you to try them.


Neat Loaf is a delicious, vegan, Raw Food version of Meatloaf. No, I mean it, It's delicious. Remember the Kitchen Cheetah's rule: if it's yucky - it's banned!

This recipe has been time-tested. My mom says that it makes a terrific vegan taco meat - Just crumble it and season with Mexican seasoning, then dehydrate it in a food dehydrator, until it is a "meaty" texture.

Make a big batch of this 'Neatloaf" and store in your freezer for quick meals later. It is a great food for cleansing diets, vegan, vegetarian, etc... Check all your ingredients if you are on a gluten-free diet.


RAW NEAT LOAF Recipe:


Ingredients:

1/2 c. Raw pecan (or filbert) butter

3/4 c. Wild rice (or rye), soaked and rinsed 2 days minimum (up to 4 days if kept cool), chopped. (Rice is very tough, it must be soaked and chopped into pieces before grinding with a CHAMPION Juicer.)

1/4 c. Lentils, soaked and sprouted 2 days and chopped

1/4 c. Sunflower seeds, soaked in water with a pinch of Vitamin C added, for 6 hours, then chopped

1/4 c. Dried tomatoes, soaked in 1 cup water till soft, and then chopped

1/2 c. Walnuts, soaked 8 hours and rinsed, and then chopped

1 c. Minced zucchini, partly dried in a food dehydrator, until "leathery"

2 T. Olive oil

1/2 c. Minced carrot

1/2 c. Minced celery

1/2 c. Minced parsley

1/2 c. "Sauteed Mushrooms and Onions"

1/2 c. Minced fresh basil

2 Green onions, minced

2 large Garlic cloves mashed with 1/2 t. sea salt

2 T. Tahini

2 T. Shoyu

2 T. Nutritional yeast flakes

2 T. Ground flax seeds

2 T. Walnut oil (or olive oil)

2 t. Sweet paprika

1 T. Miso

1 t. Fresh minced rosemary (optional)

1/4 t. Ground white pepper

1/2 to 1 t. Sea salt (to taste)

2 t. Guar gum (if making veggie burgers)


Equipment:

Champion Juicer
Knife and chopping block or food processor
Large bowl and spoon
Food dehydrator


Directions:

Mix pecan butter and chopped wild rice together.

Process through a CHAMPION JUICER until creamy.

Place the rest of the ingredients in a bowl with the rice and pecan butter. Stir well.

Taste for flavor. Adjust if necessary.

shape into 10, 1/2-cup loaves on food dehydrator screens. Dry at 110 degrees about 6 hours.

Serve warm with olive oil, ketchup, or BBQ sauce drizzled on top.

Makes approximately 10 loaves. Freezes and reheats well.


Helpful hint: Make the "Neatloaf" one day, chill. Form the loaves and dry them the next day.


Recipe created by the Kitchen Cheetahs, Nancy Glazier & Irene Hauver.


Enjoy!

Author, Leila Wood.