Showing posts sorted by date for query salt. Sort by relevance Show all posts

Wednesday, December 1, 2021

Chunky Guacamole Dip

This fresh and easy to prepare dip offers lots of flavor as well as healthy fats. Try this on top of a taco salad, or in a wrap, along with grilled chicken or fish.


INGREDIENTS:

2 large ripe avocados

1/4th lime, juiced

1 clove garlic, mashed to a paste in a mortar & pestle (or dash granulated garlic)

2 vine-ripe tomatoes, diced

1/4 C minced red onion

1/4 C minced fresh cilantro

1/4 t. Onion salt, to taste


METHOD:

In a small bowl combine the avocado flesh with the lime juice and lightly mash together.

Add the garlic and stir well.

Add red onion, tomatoes, and cilantro, stirring to combine.

Season with onion salt to taste.

Serve immediately.

This is a perfect dip for organic blue corn chips!


Enjoy,

Leila.

www.kitchencheetahs.com


Saturday, October 3, 2020

Classic Mustard Potato Salad - Deli Style


I’ve been on a potato salad kick this summer. I like variety, so you are getting a delicious array of potato salad recipes on this blog. They are easy to make and store well in the refrigerator, and best of all are available for quick meals, which is great for active summers.

This classic version is an improved deli-style mustard potato salad. It is savory, slightly sweet, and has a pleasant hint of mustard. I actually like this much better than what you will find at a deli.

One of my potato salad pet peeves is a bland, pasty potato salad. None of my posted potato salad recipes fall into that category (are there enough 'P's in this paragraph?). 


Classic Mustard Potato Salad:

10 Yukon Gold potatoes, scrubbed
4 eggs, hard boiled
1/2 c. Best Foods mayonnaise
1 T. Heinz yellow mustard
1/4 c. sweet pickle relish (sugar free and chemical free, if you can find it)
1 T. sweet pickle juice (from sugar-free sweetened pickles, if you can find them)
1 t. sugar (or xylitol)
1/2 c. sweet onion, finely diced
1 1/2 t. sea salt
50 grinds fresh black pepper
3 scallions, diced for garnish


Method:

Dice the scrubbed potatoes into about 1-inch cubes (you may peel if you want to).

Boil the potatoes in a large pot of water until just soft enough to pierce with a knife, about 7-8 minutes. You want the potatoes still a bit firm, not mushy.

Peel and dice the hard boiled eggs.

In a large serving bowl, mix together the mayonnaise, mustard, relish, pickle juice, and sugar, making sure you stir until the sugar is dissolved.

Add the minced sweet onion and salt and pepper, to taste. Season it well because potatoes seem to eat up a lot of the flavor, leaving you with a bland potato salad a few hours later, if you don't watch it.

Once the potatoes are done cooking, drain them, and add to the dressing, along with the eggs. mix gently and taste for seasoning.

Chill the potato salad until completely cold, to let the flavors meld. Taste for seasoning again before serving, and adjust if needed.

Serve garnished with the diced scallions.


Enjoy,

Leila.


Tuesday, March 22, 2016

Tender Flavorful Beef Carnitas - Clean Eating, Paleo, Gluten Free

Shredded Beef Carnitas served over top a fresh Mexican salad.

These Beef Carnitas are very tender and mildly sweet and spicy. If you use raw or fresh (not cooked or pasteurized) pineapple juice, it will tenderize your meat further by the bromelain content that pineapples contain. This recipe is very similar to my Pork Carnitas, I just added a bit more garlic to the beef version. See my Pork Carnitas recipe on my other blog called BeauteandtheFeast.blogspot.com.

You can make these carnitas in advance but it is super easy to make 4 hours before you plan on eating dinner. You will have a lot of leftover meat, unless you are feeding quite a large family. The left over meat is perfect for filling chimichangas, burritos or tacos, or use in a Mexican-style casserole, or as a Mexican salad topper, ... Yum.

What I love about meats that have been simmered in well-flavored broths or sauces, is that it usually keeps the meat from tasting oxidized when the meat is reheated as leftovers. Oxidation is prevented by the use of herbs and spices. Adequate salt in the cooking liquid helps all the flavors to permeate the meat, bringing the flavor throughout nicely. Reheating the meat on the stove instead of in the microwave keeps the leftover meat tasting fresh.

I am one of the unusual (weird?) people who can taste that oxidized off-flavor in meat. Rarely have I ever met people who can taste that like I can. It's been really annoying actually, because I can't stand leftover roast beef, chicken (strangely, Costco's rotisserie chicken, boned and packaged air-tight has tasted great), turkey (bleh, although brining it with herbs has helped), pork, let alone game meat. Microwaved meat is the worst! I see other people enjoying their leftover reheated whatever, and I can't eat it with out feeling sick, and I have to pick the meat out. It makes it hard for me to get the protein I want. I can usually eat meat if its freshly prepared with out a problem, unless it's old, improperly stored meat. Believe it or not, I do not like being a vegetarian. I will eat that way a lot, but I listen to my body in it's requests for good meat. It took me until I was in my late 30's to even figure out what that yucky "taste" was. I was doing research on professional food manufacturing and how a company was attempting to deal with the off-flavors of oxidized meat, extending it's shelf life. I found out I wasn't crazy after all....I'm just a "Super Taster." I should have a Super Hero cape made for that.

On to the recipe...


Beef Carnitas Recipe:

2 t. chili powder (gluten-free)
1 t. ground cumin
1 t. BioSalt or sea salt
1/2 t. onion powder
1/2 t. garlic powder (or granulated garlic)
1/2 t. fresh ground black pepper
3 to 4 pound beef roast, fresh or thawed
1 to 2 T. deodorized coconut oil
24 ounces unsweetened pineapple juice (can use 6 oz frozen concentrate plus 18 oz water)


Method:

Preheat your oven to 300 degrees F.

Mix the spices and salt together. Rub onto the entire surface of the meat.

Heat a large dutch oven (with a tight-fitting lid) on medium-high, add the coconut oil and sear the roast on all sides until brown, about 2 minutes per side.

Pour the pineapple juice over the roast, cover and place in the preheated oven for about 4 hours, or until the meat is fall-apart tender.

Shred the meat in the pot with 2 forks, stir into the juice and cover to keep warm.

Use in your favorite Mexican-style recipes.


Photos of the process:


Rub all sides of the roast with spice mixture.

Brown all sides of the seasoned roast in deodorized coconut oil in a dutch oven


Pour the pineapple juice over top and place on the lid.

Bake tightly covered at least 4 hours, until fall-apart tender.

Shred the Meat once it is fall-apart tender

Stir the shredded meat into the juice.

Serve hot with your favorite Mexican meal (this salad is dairy-free and grain-free).


Enjoy,

Leila.

Wednesday, March 9, 2016

Copy Cat Kneader's Autumn Bisque Soup


Thick, rich, slightly sweet, and perfectly spiced = Decadent - that's what this soup is...

This soup reminds me of pumpkin pie. Pie you can drink! Actually, it's not nearly as sweet as pumpkin pie, but I do think it is richer. A good friend of mine loves this soup from Kneader's Cafe in Utah. Because it is so rich, she orders in in a small 1/2-cup size and enjoys a salad with it. That's all you need, trust me! She, knowing I love to cook, has commented a few times about this delicious soup. I told her I wanted to taste it because I thought I could duplicate the recipe if I did. On our next visit, she brought me some. So I made my own version of this soup, tasting and comparing it with Kneader's soup as I went.

I am very pleased with the outcome. I used plain canned pumpkin instead of butternut squash, because it is super convenient. Either kind of squash works, just make sure it is a smooth puree. The sweetness level is identical. The spices are right on. The texture is also a match. You can use half organic milk and half heavy cream if you want to lighten the soup up a touch. If you want to lower the carbs, use 1/2 c. cream and 1/2 c. water instead.

I have not tried it yet, but I think rich coconut milk would work great in this recipe, for a dairy-free option. Coconut oil instead of butter could be used as well, but butter tastes better!

This is an autumn and winter soup, good enough to serve company. The fact that it is so easy to make is a bonus. I hope you like it!


Copy Cat Kneader's Autumn Bisque Soup Recipe:

1 T. Flour (or gluten-free flour)
2 T. butter
3 T. coconut palm sugar (or brown sugar) (use Golden Lakanto or brown 'Just Like Sugar' for a sugar-free version)
3/4 t. pumpkin pie spice
1 c. butternut squash puree (or plain canned pumpkin)
1 1/2 c. purified water
1/16 t. onion powder
1/2 t. organic chicken base
1/2 t. sea salt
1 c. cream

Method:

In a medium sized soup pot melt the butter over medium heat until it sizzles. Add the flour and make a roux, letting the butter brown for flavor.

Add the coconut palm sugar and let it caramelize a little for rich caramel flavor notes. Do not burn.

Add the pumpkin pie spice and let it sizzle a few seconds to bloom the spice blend's flavor.

Add some of the water (carefully) and stir in until all the palm sugar is dissolved.

Add the butternut squash or pumpkin puree and the rest of the water, stirring to blend.

Add the onion powder and chicken base and then turn down the heat to a gentle simmer.

Add the cream and let it simmer about 5 minutes, Do not let it boil.

Check for consistency before serving. Add more water if it is too thick. It should not be thin and running off the spoon, but it shouldn't be falling off the spoon in blobs either.

Serve hot in 1/3rd to 1/2 cup portions.

Garnish with butter toasted pecans that have been dusted with a mixture of cinnamon and coconut palm fruit sugar (replacing regular white sugar)


This is a very rich, decadent soup!

Notes: 

For the pecans I would chop them, saute then in just a bit of butter or coconut oil, then dust with cinnamon sugar. You can mix 'Just Like Sugar' (natural sugar substitute) with cinnamon for a sugar-free version. You may use organic coconut palm sugar for a healthier sugar (not sugar-free).

For the croutons I would use gluten-free bread cubes tossed with a bit of melted coconut oil and then toasted until crisp in the oven. While they are still hot, sprinklecroutons with your desired cinnamon sugar mixture and let cool.


This is what Kneader's Autumn Bisque Soup looks like. They top it with cinnamon pecans and a cinnamon sugar crouton.

The pecans seem like they are lightly sauteed in butter then sprinkled with a tiny bit of cinnamon sugar.

Kneader's soup in the plastic cup compared to my version on the plate. They look very similar.

My finished copy cat version.

Cinnamon toast would be nice on the side, or make your own sugar-free cinnamon sugar GF croutons. 

Enjoy!

Leila.

Sunday, January 31, 2016

South African Sour Cream Green Beans - A Quick & Easy side dish


Creamy, zesty, tangy, and savory, this side dish adds interest to any classic dinner. I love this unique recipe. My mom made it when I was a teenager and I made sure I saved the recipe in my recipe box before I left home to start my own family.

I love the creamy tang the sauce lends to the green beans. The sauce is seasoned perfectly, just make sure you use enough salt to bring out all the flavor. Using our BioSalt recipe on this blog is a healthier version to commercial table salt.

Make sure you do not overcook the green beans. they should still be bright green and firm.

This makes a great side dish and is good served with a variety of meats or vegetarian fare. Gently heat any leftovers,


Sour Cream Green Beans Recipe:

2 packages frozen green beans
2 onions, diced
2 T. butter or olive oil
1/2 c. organic sour cream
1/2 c.plain yogurt
1 t. red wine vinegar
1/4 t. coconut palm sugar (or sugar)
2 t. sweet paprika
garlic, to taste
onion powder, to taste
BioSalt or sea salt, to taste


Method:

Steam the green beans until tender-crisp. Set aside and keep warm.

In a large skillet, saute the onion in the butter or olive oil until translucent.

Add the sour cream and yogurt to the onions and turn heat down to a low simmer to avoid curdling the sour cream. Do not let it boil. Stir together well.

Add vinegar, sugar, and paprika. Season to taste with garlic, onion powder, and salt.

Mix in hot steamed green beans. Stir and serve immediately.


Notes: 

Alternately, you may  cook raw, trimmed green beans in lightly salted water, covered, for about 8 minutes, or until tender-crisp. Drain in a colander and keep warm.

French Creme Fraiche is a great substitute for the sour cream, and it does not curdle when heated like sour cream does!


Enjoy,

Leila.


Tuesday, January 26, 2016

Refreshing Lime Quinoa Salad - Gluten Free & Healthy


This healthy, vibrant salad is very fresh tasting and delicious. It's an easy keeper in the fridge and is a nice staple to have around for quick meals.

The lime makes the salad bright tasting and the maple syrup tempers the acidity perfectly.

You may serve this with gluten-free corn chips, served over top romaine lettuce or baby spinach, as a lettuce wrap filling, or eat it as-is. It's all good.

You can omit any salt in the recipe so that the salad stores well in your refrigerator a few days without getting watery. Add a touch of salt, to taste, to the portion that is served.

I hope you enjoy this nutritious, easy to make salad as much as we do!


Refreshing Lime Quinoa Salad Recipe:

Salad:


1 c. quinoa
2 c. water
1 can black beans, rinsed well
2 large tomatoes, diced small
4 small scallions, including the green tops, minced (or 2 large)
1/2 c. chopped cilantro leaves

Dressing:

zest of 2 large limes (about 1 heaping T.)
1/4 c. fresh lime juice (about 2 large limes)
1/4 c. extra virgin olive oil (or rice bran oil)
2 T. real maple syrup
1/2 to 1 t. BioSalt or sea salt
1 to 2 t. salt-free seasoning of choice, optional


Method:

Place the quinoa in a large fine mesh strainer. Rinse the quinoa and soak at least 15 minutes in a bowl of water, and rinse again.

Simmer the quinoa and the 2 cups water in a pot, uncovered, for about 10 minutes. Turn off the heat, cover, and let stand on the burner for another 10 minutes.

Strain off any excess water, then let cool as you prepare the rest of the salad.

Combine the dressing ingredients together in a serving bowl, to taste.

Add the cooked quinoa to the salad dressing and toss well.

Add the drained black beans, tomato, scallions, and fresh cilantro and toss well.

Serve warm or chill and serve cold.


NOTE: 

If you plan on storing in the fridge for 2 to 3 days, only add salt at serving time, as you eat it. This prevents the tomatoes from releasing as much juice, eliminating liquid at the bottom of the bowl. If liquid does accumulate, no worries, just stir and serve.


Enjoy,

Leila.

Saturday, January 9, 2016

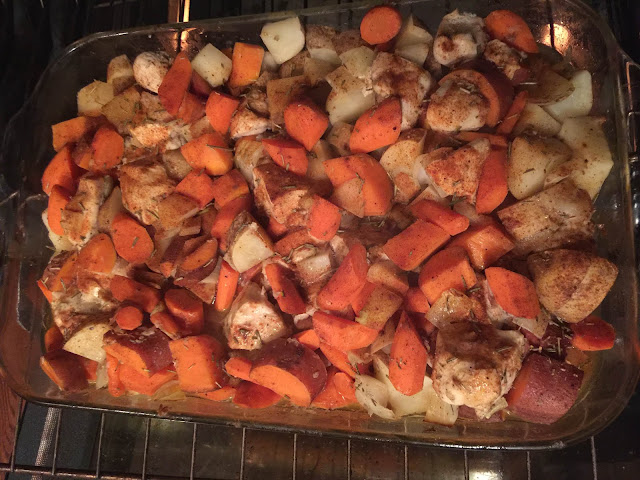
Rosemary Roasted Chicken & Winter Vegetables


This is pure comfort food. It warms you thoroughly on a cold winter's night and makes enough to feed at least 6 hungry people.

The chicken is juicy and perfectly seasoned. The roasted vegetables are buttery and tender and compliment the chicken nicely. The sweet potatoes add a delicious touch of sweetness and the rosemary's fragrance perfumes the whole dish. This is a satisfying meal that will be enjoyed often.

This easy meal is inspired by our EASY JUICY ROAST CHICKEN recipe also on this blog.


One Dish Roast Chicken & Vegetables:

Serves 6

4 large organic chicken breasts, brined and cut into large chunks
2 T. deodorized coconut oil for oiling the baking pan
1 onion, cubed
10 to 12 organic carrots, peeled and cut into chunks
3 large organic russet potatoes, scrubbed and cut into chunks
1 to 2 large organic sweet potatoes, scrubbed and cut into chunks
4 large garlic cloves, peeled and mashed with 1/2 t. sea salt
1/2 cup melted organic butter or ghee
1 t. seasoned salt
1/2 t. fresh ground black pepper
1/2 t. onion powder
1 t, dried rosemary, crumbled
Sweet paprika, to sprinkle on top as a garnish


Method:

Thaw and brine skinless, boneless chicken breasts in water that has 2 T. sea salt dissolved into it. Let the meat soak completely covered in the brine 30 to 45 minutes. Rinse and cut meat into about 2-inch x 2-inch chunks. Set aside.

Oil an extra large casserole dish with deodorized coconut oil (otherwise you will taste coconut).

Wash and prepare the raw vegetables and place in the oiled baking dish.

Place the raw chunks of chicken on top of the raw vegetables. Sprinkle the meat with the seasoned salt and onion powder. toss the meat to coat with the seasonings evenly.

Sprinkle pepper and rosemary over everything in the baking dish.

Mash the garlic with the salt.

Melt the butter, then add the mashed garlic. Pour the garlic butter over top and toss everything together well to evenly coat.

Sprinkle with paprika and dot with more butter, if desired.

Cover with foil and bake at 350 degrees F, for 60 minutes.

Uncover, toss, and bake an additional 15 minutes at 400 degrees F.

Serve hot with a fresh green salad and fruit on the side. Have seasoned salt at the table too.


Note: For a dairy-free version, replace the butter with a total of 1/4 c. deodorized coconut oil.


Enjoy, 

Leila.

Monday, November 30, 2015

Salsa Fresca - A La Casita Restaurant Copy-Cat Recipe

Try this addictive salsa recipe inspired from the restaurant called La Casita, in Springville Utah.

La Casita is famous for their Salsa Fresca. Customers take it home by the quart.

It is quite tomato-y and hot, with visible cubes of white onion in it. I have not tasted garlic in it and it isn't in their description, so I don't think La Casita uses it here.

I recreated their salsa at home, since I do not have access to the restaurant anymore. Tis is a simple reipe, yet a lot of people find this salsa addictive. Try it and see what you think!


See this post about La Casita and a recipe for their chicken salad: http://kitchencheetahs.blogspot.com/2015/05/copy-cat-la-casita-chicken-salad.html


La Casita Salsa Fresca Copy Cat Recipe:

1 14.5 ounce can diced tomatoes
1/2 c. minced white onion
1 t. sea salt
1/4 to 1/2 t. hot pepper flakes, to taste
1 tomato, diced
1 yellow chili, minced (or green)
1 t. fresh cilantro leaves, minced


Method:

Mince the onions and chili pepper in a food processor. Quarter the tomato and add to the food processor, pulse until chopped. Add the cilantro and pulse.

Add the seasonings and canned tomato. Pulse just to barely chop.

Check for seasoning. Eat immediately or chill before serving.

This is best the day that it is made.


Enjoy,

Leila.

Sunday, November 15, 2015

Family Style Chili - A much better copy-cat of Stagg Classic Chili! Plus a note about nightshades...

Family Style Chili

This makes a big pot of delicious chili that is great to serve at family gatherings. It can easily be made ahead and reheated if needed. The flavor is well-rounded yet mild enough that kids love it too. Our recipe is reminiscent of a commercial brand of chili called Stagg Classic Chili. Homemade is always better, and this chili is no exception. I did not set out to re-create Stagg's chili, it just happened.

Our recipe is easier to digest than some chilis, and is nice and tomato-ey as well. It is also less acidic than most tomato-based chilis, due to a touch healthy sweetener being added.

Note that green peppers assault some people's taste buds. If you are one of these people or have a family member who is, just replace the green pepper with a red bell pepper, or even a yellow one. Green bells are technically unripe anyway, and are the most bitter tasting of the three. Red bells are usually the sweetest.

Goji berry bush
Bell peppers are also a member of the nightshade plant family, and some people are sensitive to that, if so, omit the bell peppers (and the tomatoes for that matter!). By sensitive, I mean, some folks experience arthritic-type symptoms when they consume members of the night shade family. Maybe I should just call this nightshade chili! Uh, OK, don't eat this chili if you want to avoid vegetables from the nightshade family.

Other members of the night shade family are: chili peppers (all), potatoes (not sweet potatoes or yams), tomatoes, tomatillos, eggplant, goji berries, cape gooseberries... Just so you know.


Cape Gooseberry fruits

So, back to the chili recipe! It makes a hearty, delicious meal and I think you will love it.


Family Style Chili Recipe:

2 pounds organic ground beef or turkey
1 medium onion, diced small (about 1 cup)
3 stalks celery, diced small (about 1 cup)
1 green bell pepper, diced small (about 1 cup)
3 cloves garlic, smashed with some of the salt
1 1/2 T. chili powder, to taste
1/2 t. cumin powder
1/2 t. garlic powder
2 15-ounce cans organic kidney beans, undrained
1 15-ounce can organic great northern white beans, undrained (or a 3rd can of kidney beans)
1 6-ounce can organic tomato paste
1 28-ounce can organic diced tomatoes
1 15-ounce can organic crushed tomatoes
1 cup organic chicken stock
1 t. organic beef base
1 c. purified water
3 T. Golden Lakanto zero-cal sweetener or organic coconut palm flower sugar (replaces brown sugar)
2 t. sea salt or BioSalt, to taste


Method:

In a soup pot, saute the ground beef with the onion, celery, green pepper, and garlic until the vegetables are tender, breaking up the meat and stirring frequently.

Add the remaining ingredients, mixing together well.

Simmer, covered for about 90 minutes, to blend the flavors well.

Check for seasoning and adjust if needed before serving.


Serving Ideas:

Serve over buttered and seasoned baked potatoes for a gluten-free meal.

Serve over steamed and buttered summer squash for a low-carb meal.

Serve in a bowl with gluten free organic corn chips, cheese, and sour cream on top.

Serve with homemade organic corn bread and raw honey butter.

Serve over homemade gluten-free macaroni and cheese.

Serve over steamed tamales.

Serve in a bread bowl topped with cheese.

Serve any way you please!


Photos of the process:


Enjoy,

Leila.

Monday, November 2, 2015

Easy Beef or Buffalo Mexican Taco Meat (No commercial flavor packet used!)

Favorite taco meat

Here is our family's favorite taco meat. it is incredibly easy to make and it tastes so much better than taco meat made with those commercial flavor packets you can buy at the store. I actually hate the taste of those flavor packets, but my mom always made hers from scratch...Yes, I know I'm spoiled.

You can make this taco meat with either organic ground beef, ground buffalo, or beefalo. Even ground turkey works.

At times, I have also added up to 30% of a soy protein meat substitute into the mix, to extend the meat. I pre-hydrate the meat substitute first before adding it to the rest of the meat. Then I add the onion, garlic, and seasonings and saute it all together. I do prefer the 100% meat version, but my family hasn't seemed to notice the difference.

I like to make a big batch of taco meat and keep the leftovers in the refrigerator for quick meals later in the week. This meat also freezes well.


Best Taco Meat Recipe:

2 pounds organic free-range ground beef or buffalo
2 onions, minced
8 cloves garlic, smashed with the salt
1 t. sea salt or BioSalt
1 t. onion salt
2 t. Ancho chili pepper powder
2 t. ground cumin
1/2 t. paprika
1 t. organic beef base
40 grinds black pepper
1/4 t. psyllium husk powder
1/4 c. purified water


Method:

Brown the meat with the onions and garlic over medium-high heat in a large skillet, until the onions are translucent and the meat is cooked through. Break the meat up as it cooks.

Add all of the seasonings, psyllium, and water and simmer until thickened.

Taste for seasoning and serve while hot.

Serve as a topping for a taco salad, inside organic corn tortillas, or gluten-free flour tortillas.


Saute the meat with the rest of the ingredients.
The finished taco meat- beef in this case.
This large grater is fun for shredding the cheddar cheese.
Heat deodorized coconut oil until a piece of corn tortilla sizzles and quickly browns.
A piece of corn tortilla sizzling away...
Fry your desired amount of corn tortillas.
Fry the tortillas until they start to brown. For stiff shells, bend in the center and fry a little longer.
Place tortillas between layers of paper towel.

Putting the taco fixings on the table.

Start putting on your taco fixings: first the meat, then cheese, then lettuce, tomatoes, salsa, sour cream, etc.
A beautiful plate of tacos!
YUM!


Enjoy,

Leila.