Showing posts with label Vegan. Show all posts

Wednesday, December 1, 2021

Chunky Guacamole Dip

This fresh and easy to prepare dip offers lots of flavor as well as healthy fats. Try this on top of a taco salad, or in a wrap, along with grilled chicken or fish.


INGREDIENTS:

2 large ripe avocados

1/4th lime, juiced

1 clove garlic, mashed to a paste in a mortar & pestle (or dash granulated garlic)

2 vine-ripe tomatoes, diced

1/4 C minced red onion

1/4 C minced fresh cilantro

1/4 t. Onion salt, to taste


METHOD:

In a small bowl combine the avocado flesh with the lime juice and lightly mash together.

Add the garlic and stir well.

Add red onion, tomatoes, and cilantro, stirring to combine.

Season with onion salt to taste.

Serve immediately.

This is a perfect dip for organic blue corn chips!


Enjoy,

Leila.

www.kitchencheetahs.com


Tuesday, January 26, 2016

Refreshing Lime Quinoa Salad - Gluten Free & Healthy


This healthy, vibrant salad is very fresh tasting and delicious. It's an easy keeper in the fridge and is a nice staple to have around for quick meals.

The lime makes the salad bright tasting and the maple syrup tempers the acidity perfectly.

You may serve this with gluten-free corn chips, served over top romaine lettuce or baby spinach, as a lettuce wrap filling, or eat it as-is. It's all good.

You can omit any salt in the recipe so that the salad stores well in your refrigerator a few days without getting watery. Add a touch of salt, to taste, to the portion that is served.

I hope you enjoy this nutritious, easy to make salad as much as we do!


Refreshing Lime Quinoa Salad Recipe:

Salad:


1 c. quinoa
2 c. water
1 can black beans, rinsed well
2 large tomatoes, diced small
4 small scallions, including the green tops, minced (or 2 large)
1/2 c. chopped cilantro leaves

Dressing:

zest of 2 large limes (about 1 heaping T.)
1/4 c. fresh lime juice (about 2 large limes)
1/4 c. extra virgin olive oil (or rice bran oil)
2 T. real maple syrup
1/2 to 1 t. BioSalt or sea salt
1 to 2 t. salt-free seasoning of choice, optional


Method:

Place the quinoa in a large fine mesh strainer. Rinse the quinoa and soak at least 15 minutes in a bowl of water, and rinse again.

Simmer the quinoa and the 2 cups water in a pot, uncovered, for about 10 minutes. Turn off the heat, cover, and let stand on the burner for another 10 minutes.

Strain off any excess water, then let cool as you prepare the rest of the salad.

Combine the dressing ingredients together in a serving bowl, to taste.

Add the cooked quinoa to the salad dressing and toss well.

Add the drained black beans, tomato, scallions, and fresh cilantro and toss well.

Serve warm or chill and serve cold.


NOTE: 

If you plan on storing in the fridge for 2 to 3 days, only add salt at serving time, as you eat it. This prevents the tomatoes from releasing as much juice, eliminating liquid at the bottom of the bowl. If liquid does accumulate, no worries, just stir and serve.


Enjoy,

Leila.

Tuesday, December 1, 2015

Vegan Lemon Jello

Vegan Lemon Jello
We are very excited to bring this recipe to you. We have been thinking about creating this for a few years... it was one of those back burner projects. This is an excellent recipe. It's like real jello!

Have you ever had vegan jello before? No? Well, I will tell you about it... It is typically a harder gel than traditional gelatin jello. It's pretty tough and stiff actually. Not excellent to eat. It doesn't really jiggle either, which is half the fun. You miss the tender, bouncy mouth-feel of traditional jello.

Well, we worked out all those issues for you! My mom did actually on her first attempt. This original recipe was created by my mother, Nancy Glazier on July 14, 2015. We will be creating more versions of jello in the future, just so you know.

We also got rid of all the sugar, artificial sweeteners, artificial flavors, and artificial colors. Very cool, right? Now we can all eat a healthy, low carb, chemical free jello, and kids will love it too.

In formulating, taste is king, and texture is queen. That means if a healthy food doesn't first, taste good, and second, have an agreeable texture, the healthy food is “Right OUT”. (If that doesn’t ring a bell, it’s time to watch The Holy Grail again.) People will not eat it (Well, maybe 2 people will eat it), Which means if the product sells once and misses the mark, consumers will not buy the product again. That's not good for business.


Taste and texture is our specialty here at the Kitchen Cheetahs Test Kitchens. Part of our job when we professionally formulate is to make healthy foods taste good and have nice texture. We create a lot of delicious and unique formulas that are not commercially manufactured, which is a bonus for your family and ours. That's why we do it, so we can all benefit (and we love the creative challenge too).

So this is one of those recipes we created because we wanted a much better option than what is available in stores, or found from online recipe searches.

Follow the directions in the order given, so the texture turns out perfectly, it's worth the effort.

We hope you love this recipe like we do!


Tangy Vegan Lemon Jello:

2 1/2 c. plus 2 T. water, divided
3/4 t. tapioca starch
1/2 c. boiling water
2 t. agar agar powder
1 small pinch tumeric powder
3/4 c. white Lakanto zero-calorie sweetener, powder
3 T. strained lemon juice
1 T. vegetable glycerine
1 drop organic lemon essential oil
Stevia Glycerite, to taste


Method:

Dissolve 3/4 t. tapioca starch into 2 T. water. Set aside.

Bring 1/2 cup water to a boil. Add the tapioca starch slurry to the boiling water while stirring. Cook and stir until mixture is thickened. Remove from heat and set aside.

Mix 2 t. agar agar powder into 1/4 cup water and blend until smooth. Whisk in 1 3/4 cup more water and let sit 5 to 10 minutes. Cook and stir the agar agar mixture until it comes to a boil. Boil 1 minute. The solution should reach 190 to 195 degrees F, to fully dissolve the agar agar.

Mix the thickened tapioca water into the agar agar solution.

After mixing together well add 1 small pinch of tumeric powder (for color), and 3/4 cup powdered white Lakanto.

Stir in 3 T. Strained fresh lemon juice (you can add up to 1/4 cup for a very tart lemon jello).

Stir in 1 T. vegetable glycerine, 1 drop lemon essential oil, and stevia glycerite to taste.

Reheat the mixture, stirring occasionally, to 190 degrees F. Let sit 5 minutes.

Pour into molds and allow to set UNDISTURBED for at least one hour (up to 3 hours).

Chill before serving. Unmold jello by setting molds in very hot water for about 30 seconds.


NOTE:

If you coat the jello molds very lightly with a non-stick coating spray like Pam, the jello will unmold more readily.


See how fun and jiggly this amazing jello is... Watch the video above.


Beautiful, isn't it?


Enjoy!

Leila & Nancy.

Saturday, October 31, 2015

Leila's Smoky Mexican Chicken Soup - Easy and Delicious!

Leila's Easy Smoky Mexican Chicken Soup
I created this soup after I made a bunch of chicken stock from a couple of Costco rotisserie chickens. I wanted a Mexican-style soup that was loaded with healthy vegetables, had a hit of smoky flavor and was not creamy.

This soup turned out super! our family loves it and we have really enjoyed the leftovers. It is warming for these cool fall evenings we are having.

I really like the zucchini in this soup. I used a huge tough zucchini from our garden for this soup. I peeled it and then removed all the seeds. I then chopped it into small cubes. The older zucchini stay nicely firm in simmered soups. If you have tender zucchini, add it towards the end of cooking time, so that you don't turn it into mush.


Leila's Smoky Mexican Chicken Soup Recipe:

1/2 pound bacon
1 extra-large onion, minced
6 large cloves garlic, smashed
2 stalks celery with tops, minced
3 large mild chiles, fire roasted and then cored, seeded and minced
4 tomatillos, minced
4 roma tomatoes, diced
1 14.5-ounce can petite diced tomatoes with chipotle chiles
1 7-ounce can La Victoria Fire Roasted diced green chiles (this brand has the best roasted flavor)
3 quarts chicken stock (home made is best)
1 bay leaf
1 t. ground cumin
2 14.8-ounce cans Great Northern beans, drained
1 29-ounce can Mexican-style hominy, drained
2 zucchini, cubed
1 T. sea salt, to taste
35 grinds fresh ground pepper, to taste
2 to 4 cups shredded cooked chicken meat
Smokey paprika, optional, to taste


Method:

Over a gas flame, char the whole chiles, then remove stem and seeds and mince. Set aside.

In a large soup pot, fry the bacon until crispy. Remove bacon and crumble, then set aside.

With the bacon fat left in the pot, saute on medium-high heat, the onion, garlic, celery, chilies, and tomatillos, until the onion becomes transparent.

Add the canned tomatoes and canned green chiles. then add the chicken stock.

Add the bay leaf, cumin, canned beans, hominy, and diced zucchini. Bring up to a boil. Once boiling, turn down to a simmer and let it simmer about 30 minutes.

Season the soup with the salt and pepper, to taste. Add the crumbled bacon and shredded cooked chicken meat. let simmer a few more minutes before serving. Check the seasoning.

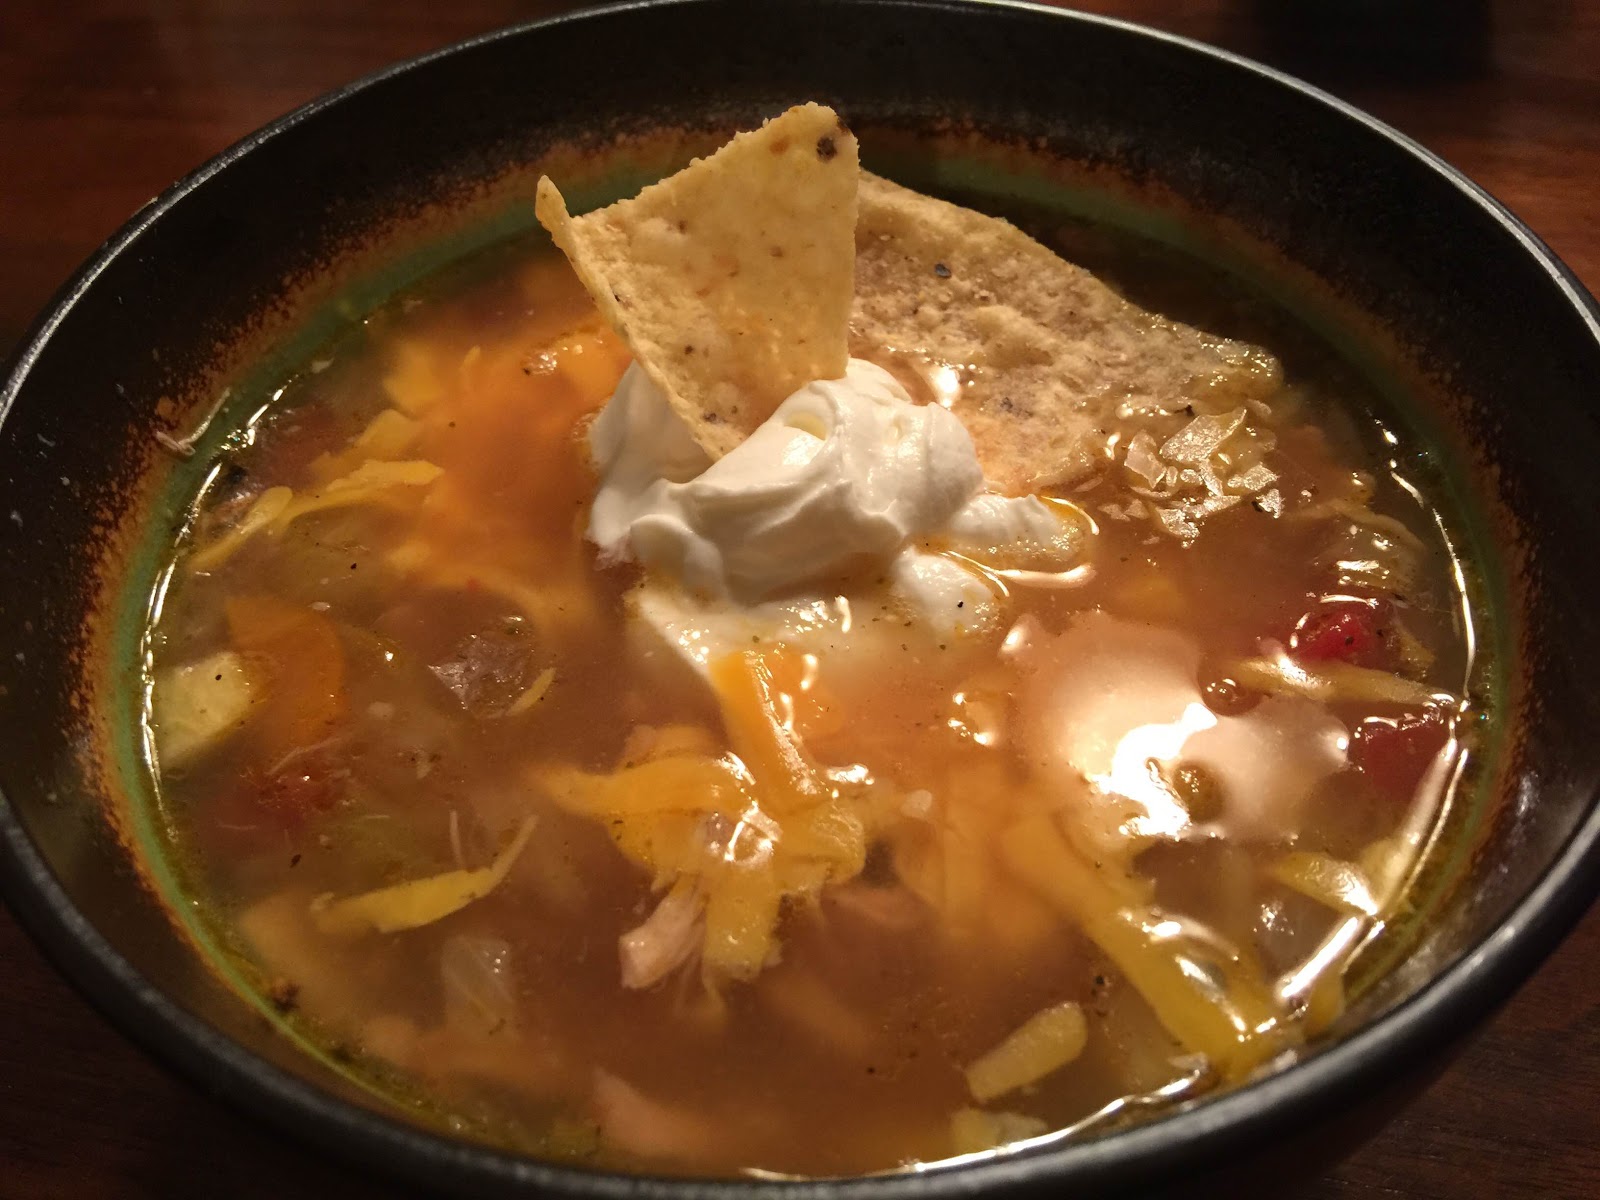
Garnish the soup with sour cream, shredded cheese, cilantro, lime wedges, corn chips, as desired.


Notes:

Use gluten-free corn chips if desired.

If avoiding corn, omit the hominy and corn chips.

If dairy-free, omit the cheese and sour cream garnishes.

For a vegan option, omit bacon and saute the vegetables in deodorized coconut oil. Add smokey paprika to give a nice smoky flavor. Use vegetable broth in place of the chicken stock. add an extra can of beans in place of the shredded chicken.

In place of the canned petite diced tomatoes with chipotle chiles, use regular diced Mexican or plain diced tomatoes. Add these additional seasonings: 1/4 t. Mexican oregano, 1/4 t. dried chipotle powder, 1/4 t. additional cumin, to taste.


Enjoy,

Leila.


Wednesday, July 22, 2015

Sugar-Free Cinnamon Frosted Paleo Granola

Cinnamon Frosted Paleo Granola

Would you like a delicious, lighter, crunchier, grain-free, low-carb granola? Well, here it is!

Here is our unique and delicious recipe for a sweet cinnamon-frosted grain-free granola. Our recipe calls for an unusual ingredient: YAMS. That's right, soft baked yams or sweet potato. It is a great binder for our granola, making cute crunchy clusters of goodness. 

We will be posting many other unique yammy recipes under the Kitchen Cheetahs category called, "I Yam That I Yam". 

This granola stays crunchy in milk for a long time and the dried fruit stays nice and chewy too. We like that.

There are no almonds (give the poor bees a break!), no grain, and no sugar added to this recipe. It is sweetened only by the erythritol, dried fruit, and sweet potato.

This is a very versatile recipe. There are 4.5 cups of mixed nuts and seeds in this recipe (in addition to the coconut). Feel free to make your own substitutions with any kind of nuts or seeds you wish. For example, you could swap almonds for the walnuts. You may also use other dried fruits like dried diced California apricots, organic raisins, chopped dates, dried cranberries, dried cherries, etc. There could be almost limitless variations...


We can think of many uses for our granola:

You could make a granola "crumb crust" very easily out of it.
You could use it as a base for killer granola bars.
You can sprinkle it on top of ice cream sundaes.
You can make yogurt parfaits with it.
You can create awesome trail mixes with it as the base, adding more dried fruit, chocolate chips...
You can sprinkle it on top of our chocolate or butterscotch protein pudding recipes.

Yes, we really like this granola. It is crunchy and chewy at the same time, and has a real nutty- cinnamon-y flavor. PLUS, it's "CINNAMON FROSTED" ðŸ˜®


Cinnamon Frosted Paleo Granola

Cinnamon Frosted Paleo Granola Recipe:

Dry Ingredients:
2 c. chopped walnuts (or pecans or almonds)
1 c.  coarsely ground raw sunflower seeds
1 c. dried coconut chips (wide thin ribbons)
1 c. flaked dried coconut (macaroon-style)
1 c. organic raisins (or chopped dates or chopped dried figs)
1/2 c. freshly ground flax seed meal
1/2 c. sesame seeds
1/2 c. Brazil nut flour (or other nut flour)

Wet Ingredients:
1 1/2 c. powdered Lakanto
1 T. ground cinnamon
1 t. sea salt
1 c. warm mashed sweet potato (baked until soft)
1/3 c. coconut oil
1/3 c. hot water

Cinnamon Frosting:
1/2 c. powdered Lakanto
1 T ground cinnamon


Method:

Mix together the listed dry ingredients in a large mixing bowl and set aside.

In a food processor puree the listed wet ingredients together until smooth.

Scrape the pureed wet ingredients into the bowl of dry ingredients and combine well.

Crumble the combined mixture into small clusters onto 2 large rimmed cookie sheets.

Bake in a preheated 300 degree F. oven for 1 hour, stirring every 20 minutes.

Lower the heat to 200 degrees F. and bake for another hour, stirring every 20 minutes.

Remove from oven and let cool 10 minutes on the cookie sheets.

Toss thoroughly with the Cinnamon Frosting mixture and let cool completely.

Store in an air-tight container.

Enjoy with your favorite vegan milk.


Enjoy with your favorite milk.
This is almond coconut milk and I was surprised how delicious this combination is!


Enjoy,

Leila & Nancy.

Copy Cat Restaurant Teriyaki Sauce & Marinade plus a Delicious Teriyaki Rice bowl - Gluten-Free, Sugar-Alternative, Paleo, Clean-Eating

Restaurant Teriyaki Sauce

Do you like that nice, thick, sweet teriyaki sauce you get 

at your favorite Asian restaurant or takeout joint?


With this new recipe you can now have it at home. 


I have tried a few home made Teriyaki recipes through the years, but they are very runny and usually too heavy on the soy sauce. I want to taste the ginger and garlic, not just sugar and soy sauce. I created this recipe to be used over Teriyaki bowls, or for glazing and dipping grilled chicken or salmon in, or even drizzle over a sushi roll! I wanted the sauce to cling nicely to the meat, not run off in a salty puddle at the bottom of my dish. I'm even going to try it in a dish called Yaki Udon (Grilled chicken, stir-fried vegetables, drained, cooked udon noodles + this sauce).

I have made this Teriyaki sauce with a healthier sweetener called organic coconut palm sugar. It looks like a more granular, dry brown sugar and it has a brown sugar type taste. It is high in minerals and is lower on the glycemic scale than regular sugar. It is not zero calorie like erythritol, but it tastes better in this sauce. If I were to make this sauce completely sugar free, I would use a combination of erythritol, xylitol, stevia glycerite and a touch of black-strap molasses. Just sayin'.

I also use a gluten free soy sauce called Tamari. It is a high quality soy sauce and is easy to find at oriental markets or your better grocery stores. Alternately you may use Bragg's Aminos, but this is not my first choice. 

I prefer to use fresh garlic and ginger for the best flavor. I like to store whole ginger root in a small freezer bag in my freezer (in a place where I can find it!). Whenever I need fresh ginger, I just pull it out of the freezer and grate the amount I need with a small Microplane grater. You can grate fresh garlic with a small Microplane too, but I prefer to smash it to death in my mortar & pestle.

I thicken this sauce with xanthan gum. Xanthan gum is easy to use and is a healthy soluble fiber. I much prefer it over using corn starch or other starches for thickening. Starches must be cooked unless they are modified starches. Starches also have carbs unless they are resistant starches. Xanthan gum thickens regardless of it being heated or not. I love using it in my home made salad dressings too. The easiest way to mix xanthan gum into your liquid ingredients is to first blend it with some of the dry ingredients, like sugar, salt, flour, etc...

This sauce recipe is easily halved. You can also start out making it less sweet by adding 3/4 cup of the sweetener, bringing it to a simmer, taste for sweetness and then add more sweetener as desired.


Restaurant Teriyaki Sauce


Restaurant Teriyaki Sauce Recipe:

1 c. Tamari soy sauce (or Bragg's Aminos, are both gluten free)
1/4 c. Mirin (sweet rice wine)
1 1/4 c. purified water
1 T. minced fresh garlic (about 6 large cloves)
1 T. minced fresh ginger
1 1/4 c. organic coconut palm sugar
3/4 to 1 t. xanthan gum


Garnishes (optional):

sesame seeds
scallions sliced on the diagonal
toasted sesame oil


Method:

In a small sauce pan mix the soy sauce, mirin, water, garlic, and ginger.

Turn the stove on to medium heat.

In a separate small bowl mix together the palm sugar and the xanthan gum.

Whisk the sugar mixture into the soy sauce mixture.

Bring up to a gentle simmer with stirring to dissolve the palm sugar. 

Once it starts to simmer, time it for one minute and then remove from heat. 

Set aside to cool and use to glaze your favorite meat or use as a dipping sauce.

Add garnishes as desired at serving time.

Store unused Teriyaki Sauce in the refrigerator. Gently reheat to use.


To Make as a Marinade:

Make the sauce in the same way, except omit the xanthan gum.The result will be a thin marinade.

Note: I also use the thickened sauce recipe as a marinade.


Tips:

For a less sweet sauce, cut the coconut palm sugar down to 1 cup, or to taste.

For a slightly thinner sauce use only 3/4 t. xanthan gum.

Mixing the xanthan gum into the dry sugar first makes the xanthan gum easy to disperse into your sauce without clumping issues. If you forget to do this, use a stick blender to blend the xanthan gum into your sauce thoroughly.


 Photos of making Teriyaki Sauce and Teriyaki Rice Bowl:

Putting the sauce ingredients together.

The xanthan gum is blended into the coconut palm sugar.

The sauce before cooking.

The thickened Teriyaki Sauce after simmering 1 minute.

Skinless boneless chicken breasts ready for marinating in Teriyaki Sauce.

Teriyaki Sauce rubbed onto the chicken and marinated 30 minutes.


Broccoli, Carrots, Cabbage, Onion, and celery chopped and ready for steaming.


The prepared vegetables in the steamer.


Steam vegetables only until tender-crisp and bright in color.

Sushi rice , steamed vegetables & grilled chicken topped with our Teriyaki Sauce. YUM.


Enjoy,

Leila.

Tuesday, July 21, 2015

Amazing Vegan Hot Fudge Sauce - Sugar-Free, Low-Carb, High-Fiber, Paleo

Amazing Vegan Hot Fudge Sauce
Enjoy this rich, smooth, and chocolaty hot fudge sauce over your favorite ice cream or use as a chocolate fondue. 

The secret ingredient here is soft baked sweet potato. It adds body to the sauce as well as healthy fiber. The quality of this yummy chocolate sauce surprised even us. We are having a lot of fun playing with soft baked yam/sweet potato in our test kitchens. More recipes using these lovely tubers are coming. I created a special section for our recipes containing yams and sweet potatoes called, "I Yam That I Yam". Don't tell me that's corny, I already know.

We love that this is a guilt-free hot fudge sauce. It's sugar-free, dairy-free, high-fiber, vegan, paleo, and contains healthy coconut oil.

Try it,we think you will like it!


Amazing Hot Fudge Sauce Recipe:

2/3 c. of your favorite milk (vegan, coconut, almond, cashew, lactose-free, low-carb...)
1 c. powdered white or golden Lakanto brand sweetener (or erythritol)
2/3 c. dutch cocoa powder
1/3 c. white sweet potato flesh (baked until soft)
3 T. coconut oil (deodorized)
1 pinch sea salt or BioSalt
1 t. real vanilla extract
1 to 2 T. of your favorite sweet syrup (IMO syrup, agave, maple...), optional
A few drops stevia glycerite, if you want it sweeter


Method:

Puree all of the ingredients together until smooth with a stick blender.

Heat and stir the mixture until it reaches 180 degrees F. to fully dissolve the Lakanto crystals.

Cool the mixture 5 minutes.

Taste the mixture to check for sweetness and adjust as desired.

Puree the mixture again on high speed with the stick blender until it is smooth and thickened.

Serve the sauce warm over your favorite dessert.

Store the unused fudge sauce in the refrigerator and gently reheat to serve. Any crystals from the erythritol that form will easily dissolve when the sauce is reheated.


Enjoy,

Leila & Nancy.


Thursday, July 16, 2015

Raspberry Cream Protein Shake Recipe using our Vanilla Sun Warrior "Warrior Blend" Protein BASE

Raspberry Cream Protein Shake

This is a fabulous protein smoothie recipe. It's thick and creamy with a big raspberry punch.

It's a favorite refreshing smoothie around these parts. We love - love - love that this is sugar-free and high in protein. You will feel like you are drinking a dessert but you are really doing your body a favor.

For this smoothie, we use our VANILLA Protein BASE recipe (pictured below in the mason jar). This convenient BASE only takes a couple minutes to whip together and then you are prepared in advance for several smoothies. We love that too.

Oh, did I mention that all of our Sun Warrior smoothie recipes are great for athletes, and those who want to slim down? They are also for the lactose intolerant and those of us who are watching our sugar and carb consumption. It's all good!

Mom's Favorite Raspberry Cream Protein Shake Recipe:

1 c. prepared Vanilla Warrior Blend Protein BASE (made with coconut + almond milk is best)
1 c. frozen raspberries (a generous cupful)
1 c. cold water
1 T. lemon juice
1/2 t. almond extract
6 ice cubes


Method:

Put 1 cup prepared Sun Warrior "Warrior Blend" Vanilla Protein Base into a VitaMix container (a high powered blender).

Top with the frozen raspberries, lemon juice, almond extract, and ice.

Blend on high speed until creamy. Taste for sweetness and add a little of your desired sweetener to taste (we like our stevia glycerite).

Blend well to fully incorporate the sweetener into the smoothie.


Tip: Sweeteners that can be used:

Stevia glycerite, vegetable glycerine, agave nectar, raw honey...


Vanilla Protein BASE at the ready to add to smoothies any time!

1 cup of the Vanilla Protein BASE is added to a blender.

A generous cup of frozen raspberries is added to the blender.

Add the rest of the raspberry smoothie ingredients and blend. YUM


Enjoy,

Leila & Nancy.

Sun Warrior "Warrior Blend" Creamy Vanilla Protein Shake Recipe + A Vanilla Protein Base Recipe Too!

Mug Shot of our Vanilla Warrior Blend Smoothie.
Here is another recipe for creating an even creamier, tastier Sun Warrior protein shake!

The flavor we are featuring in this post is VANILLA and we also show you how to make a super fast and easy Vanilla Protein BASE that can be used in smoothies, ice creams, puddings, etc...

We love using the Sun Warrior "Warrior Blend" vegan protein powders and we have created a way to make this great protein powder even better. You can create creamy, smooth , and delicious vegan protein drinks, shakes, smoothies, and more with Sun Warrior's "Warrior Blend" protein powders and our techniques we show here at Kitchen Cheetahs.

Vegan protein powders by nature, are not the smoothest substances on the planet. They can have a bit of grit to them, not fully dissolving in beverages. Sometimes vegetable proteins also have off-flavors from the vegetable sources they are used from. We show you how to counteract this.

Are you sensitive to the taste of stevia sweetened drinks? Stevia is now commonly used as a healthy sugar substitute and also sometimes causes off-taste issues for some people. We personally love stevia and use it daily in our homes. we have learned some tricks in using it that we will pass along to you here.

So my dad was wondering what my mom was whipping up in the kitchen this time (there are always adventures to be had in my mother's kitchen). A vanilla protein drink, she said. Hmmm, he said. Do you want to taste it, she asked? He acted only minorly interested (after all, it's only vanilla, right?). He took a sip, and he thought it was nice. Well, my mom walked away for a few moments, and when she came back to her vanilla protein shake dinner, it was all gone. He drank it all. Oops. The good news is, he loved it. He told her it tasted really rich and creamy and he felt full and satisfied after drinking it. This drink will keep you nourished for quite a while. My dad drinks a lot of protein drinks and he's really picky about them. He really likes this vanilla shake. We think you will love it too.

First I will give you the formula for the easy to make VANILLA Protein BASE. Make the BASE ahead of time so that it is cold before using.

Next, I will give you a smoothie formula using this BASE.


Just so we are real clear:

Recipe # 1 is the Sun Warrior "Warrior Blend" Vanilla Protein BASE.

Recipe # 2 is the Sun Warrior Creamy Vanilla Protein Shake.

Are you ready?


Sun Warrior "Warrior Blend" Vanilla Protein BASE:

Put in a VitaMix or other high powered blender:

3 c. cold milk of your choice (almond, coconut, cashew...)

Start blender on med-low and add:

1 c. Sun Warrior Vanilla flavored "Warrior Blend" protein powder

add the protein powder 1/4 cup at a time.

Add:

1/4 t. lecithin

Put the blender lid on tight and switch to the highest speed and blend until the mixture heats up to the desired temperature (from 118 to 155 degrees F). *

For the smoothest texture, use the tamper that comes with the VitaMix blender and heat to 150 to 155 degrees F.

Add:

1 t. almond extract and blend in very well.

Pour and scrape the finished BASE into a 1-quart mason jar and refrigerate overnight before using in the Creamy VANILLA Protein Shake recipe below.

This BASE needs to be kept cold and used within 4 to 5 days.


Tips: 


* 118 degrees F is for "raw"smoothies - heat up to 155 degrees F for the smoothest texture.

The BASE will be cooked at a low temperature and will be steaming at 150-160 degrees F. Some people find this "cooked" pea protein easier to digest.

Use an instant read thermometer for more accurate results.

Our favorite milk combination is 2 c. almond milk and 1 c. full fat coconut milk. Any combination of vegan milks will work to equal 3 cups of total milk used.

Lecithin is a healthy addition and makes it creamier and smoother. Lecithin is especially good for emulsifying the coconut milk.

1 cup of this prepared BASE contains 1/4 cup of the Warrior Blend protein powder.


NOTE: See our Raspberry Cream Smoothie recipe using this Vanilla BASE HERE.


____________________________________________


The following protein shake recipe is like a blank canvas, ready for you to add any combination of fruits or other ingredients that you want. Have fun with this basic recipe!


Sun Warrior Creamy Vanilla Protein Shake Recipe:

Put in a VitaMix or other high powered blender:

1 c. cold almond milk (or other vegan milk of choice)
1 c. prepared Vanilla Warrior Blend BASE, well chilled
1/4 c. coconut milk powder or 1 to 2 T. of your favorite nut butter, optional for a richer shake
1/4 to 1/2 c. mashed baked white sweet potato, or banana (makes it creamy)
3/4 to 1 t. real vanilla extract
1/4 to 1/2 t. almond extract
1 pinch cinnamon, optional
10 ice cubes (use only 8 ice cubes if not using coconut powder)

Blend everything together on high speed until nice and creamy.

Taste for sweetness level and add:

 2 T. vegetable glycerine, optional to sweeten to taste

Blend in well and serve while cold and icy.


NOTES: 

The vegetable glycerine is super low on the glycemic scale. Glycerine also enhances athletic performance by preventing dehydration. Cool huh?

The baked mashed yam, sweet potato, or banana both thickens and sweetens the drink and also cancels out the taste of the stevia, which is part of the Sun Warrior protein powder formula.

You may use other sweeteners to sweeten to taste like: Stevia glycerite, raw honey, agave nectar, etc...

Have fun with this rich and creamy basic vanilla shake recipe. You will see us use this a lot in upcoming smoothie recipes.


Here's some photos of my mom making the Rich & Creamy Vanilla Shake:


Adding ingredients for the Vanilla Shake (including the Protein BASE above).

All of the ingredients are now in the VitaMix blender.

The ready to drink Vanilla Shake topped with a sprinkling of fresh chopped figs!


Enjoy,

Leila & Nancy.