Showing posts with label Sugar Free. Show all posts

Saturday, January 9, 2016

Rosemary Roasted Chicken & Winter Vegetables


This is pure comfort food. It warms you thoroughly on a cold winter's night and makes enough to feed at least 6 hungry people.

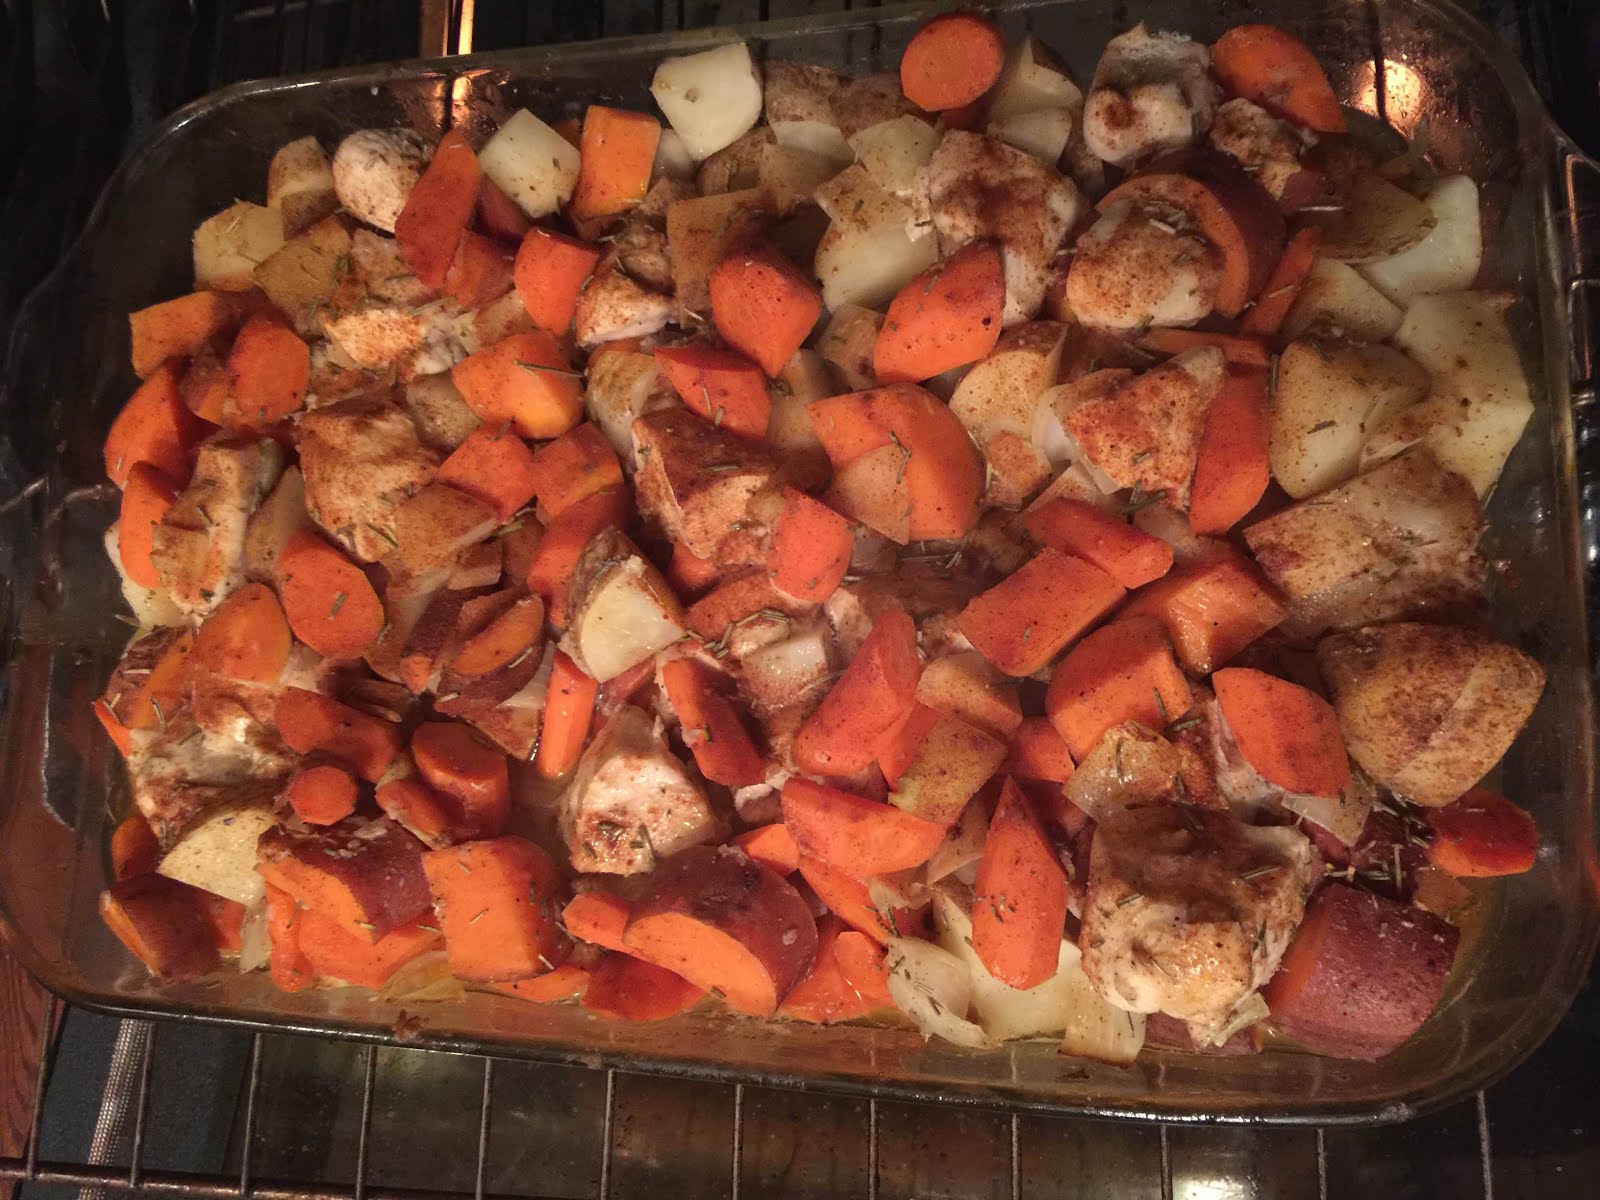
The chicken is juicy and perfectly seasoned. The roasted vegetables are buttery and tender and compliment the chicken nicely. The sweet potatoes add a delicious touch of sweetness and the rosemary's fragrance perfumes the whole dish. This is a satisfying meal that will be enjoyed often.

This easy meal is inspired by our EASY JUICY ROAST CHICKEN recipe also on this blog.


One Dish Roast Chicken & Vegetables:

Serves 6

4 large organic chicken breasts, brined and cut into large chunks
2 T. deodorized coconut oil for oiling the baking pan
1 onion, cubed
10 to 12 organic carrots, peeled and cut into chunks
3 large organic russet potatoes, scrubbed and cut into chunks
1 to 2 large organic sweet potatoes, scrubbed and cut into chunks
4 large garlic cloves, peeled and mashed with 1/2 t. sea salt
1/2 cup melted organic butter or ghee
1 t. seasoned salt
1/2 t. fresh ground black pepper
1/2 t. onion powder
1 t, dried rosemary, crumbled
Sweet paprika, to sprinkle on top as a garnish


Method:

Thaw and brine skinless, boneless chicken breasts in water that has 2 T. sea salt dissolved into it. Let the meat soak completely covered in the brine 30 to 45 minutes. Rinse and cut meat into about 2-inch x 2-inch chunks. Set aside.

Oil an extra large casserole dish with deodorized coconut oil (otherwise you will taste coconut).

Wash and prepare the raw vegetables and place in the oiled baking dish.

Place the raw chunks of chicken on top of the raw vegetables. Sprinkle the meat with the seasoned salt and onion powder. toss the meat to coat with the seasonings evenly.

Sprinkle pepper and rosemary over everything in the baking dish.

Mash the garlic with the salt.

Melt the butter, then add the mashed garlic. Pour the garlic butter over top and toss everything together well to evenly coat.

Sprinkle with paprika and dot with more butter, if desired.

Cover with foil and bake at 350 degrees F, for 60 minutes.

Uncover, toss, and bake an additional 15 minutes at 400 degrees F.

Serve hot with a fresh green salad and fruit on the side. Have seasoned salt at the table too.


Note: For a dairy-free version, replace the butter with a total of 1/4 c. deodorized coconut oil.


Enjoy, 

Leila.

Tuesday, December 1, 2015

Crazy Good Pear Sorbet - Protein fortified, sugar free, and healthy!


Try this Kitchen Cheetahs original recipe! We L-O-V-E this easy to make Pear Sorbet...

This sorbet is truly refreshing. delicious and has an amazing frosty texture. The sweet pear flavor is so bright and perfectly balanced with fresh tart lemon juice. It doesn't melt too quickly, so you have longer to savor it. Serve it for lunch. Serve it a a snack. Serve it to cleanse the palate at a dinner party. Serve it in the heat of summer. Serve it for dessert. Just serve it! You'll love it.

Here's the kicker...

It's sugar free (except for the naturally occurring fruit sugar from the pear), it's rich in vitamin C, which is good for your immune system, and it is protein enriched!

We offer you a healthy, good for you sorbet. It feels like you are cheating, but your'e NOT.

Party! 

If you live a clean eating life style, want to control your blood sugar, are avoiding dairy, or are on a low carb diet,  This is the clean, low carb frozen treat for you!

We much prefer to use collagen powder instead of egg white protein powder in this recipe. The texture is better and the flavor is cleaner with the collagen. Adding egg white protein is an OK alternative though, in case you do not have collagen powder in your pantry yet (get some).

We also do not recommend adding any plant-based protein powder to this recipe because the sorbet's flavor is so delicate, the color is so white, and the texture is so perfect as it is.


Fragrant Pear Protein-Fortified Sorbet (or Slushie):

1/2 c. cold water (you may need up to 3/4 c.)
1/2 t. unflavored gelatin powder
1 c. frozen pear cubes (1 large pear, peeled, cubed, and frozen)
1 T. vegetable glycerine
2 to 3 t. fresh lemon juice, to taste
1/2 t. vitamin C powder (ascorbic acid)
2 T. KC Sugar Substitute, to taste
1 T. collagen powder (or egg white powder as a 2nd choice)
8 to 10 ice cubes (8 to 10 ounces ice)
Stevia Glycerite, to taste


Method:

Advance preparation:

Sprinkle 1/2 t. gelatin onto the cold water and set aside 5 minutes. Heat to melt the gelatin. Cool then chill the gelatin mixture until it sets up. See note below.

Peel, core, and dice ripe pears and then freeze in individual pieces.

To make Sorbet:

Put into a high powered blender (we prefer the VitaMix):

The chilled gelatin mixture
1/4 c. cold water (you may need more water to process)
1 heaping c. frozen ripe pear (1 large pear)
2 T. vegetable glycerine
1/2 vitamin C powder
2 T KC sugar substitute
1 T. lemon juice
1 T. collagen

Puree using the tamper until smoothly integrated, then begin adding ice cubes, two at a time. Use a total of 8 to 10 ice cubes.

Blend until thick.

Add stevia glycerite to taste.

Serve immediately in frozen glasses.


NOTE:

You may prepare a quart of this gelatin gel and keep in the fridge for convenience. In a quart jar add 2 cups of cold water. Add 2 T. plus 2 t. plain gelatin powder to the jar of water. let it sit 5 minutes then heat to melt the gelatin in the microwave. Add 2 cups more water to the jar. Stir and chill the mixture in the refrigerator. Measure out 1/2 cup of this gel per batch of pear sorbet.


Placing frozen ingredients into the VitaMix blender.

Our Sorbet recipe melts much more slowly, so you have longer to enjoy it's frosty texture.

A beautiful frosty mug of PEAR SORBET!


Enjoy!

Leila & Nancy.

Monday, November 2, 2015

Easy Beef or Buffalo Mexican Taco Meat (No commercial flavor packet used!)

Favorite taco meat

Here is our family's favorite taco meat. it is incredibly easy to make and it tastes so much better than taco meat made with those commercial flavor packets you can buy at the store. I actually hate the taste of those flavor packets, but my mom always made hers from scratch...Yes, I know I'm spoiled.

You can make this taco meat with either organic ground beef, ground buffalo, or beefalo. Even ground turkey works.

At times, I have also added up to 30% of a soy protein meat substitute into the mix, to extend the meat. I pre-hydrate the meat substitute first before adding it to the rest of the meat. Then I add the onion, garlic, and seasonings and saute it all together. I do prefer the 100% meat version, but my family hasn't seemed to notice the difference.

I like to make a big batch of taco meat and keep the leftovers in the refrigerator for quick meals later in the week. This meat also freezes well.


Best Taco Meat Recipe:

2 pounds organic free-range ground beef or buffalo
2 onions, minced
8 cloves garlic, smashed with the salt
1 t. sea salt or BioSalt
1 t. onion salt
2 t. Ancho chili pepper powder
2 t. ground cumin
1/2 t. paprika
1 t. organic beef base
40 grinds black pepper
1/4 t. psyllium husk powder
1/4 c. purified water


Method:

Brown the meat with the onions and garlic over medium-high heat in a large skillet, until the onions are translucent and the meat is cooked through. Break the meat up as it cooks.

Add all of the seasonings, psyllium, and water and simmer until thickened.

Taste for seasoning and serve while hot.

Serve as a topping for a taco salad, inside organic corn tortillas, or gluten-free flour tortillas.


Saute the meat with the rest of the ingredients.
The finished taco meat- beef in this case.
This large grater is fun for shredding the cheddar cheese.
Heat deodorized coconut oil until a piece of corn tortilla sizzles and quickly browns.
A piece of corn tortilla sizzling away...
Fry your desired amount of corn tortillas.
Fry the tortillas until they start to brown. For stiff shells, bend in the center and fry a little longer.
Place tortillas between layers of paper towel.

Putting the taco fixings on the table.

Start putting on your taco fixings: first the meat, then cheese, then lettuce, tomatoes, salsa, sour cream, etc.
A beautiful plate of tacos!
YUM!


Enjoy,

Leila.

Saturday, October 31, 2015

Leila's Smoky Mexican Chicken Soup - Easy and Delicious!

Leila's Easy Smoky Mexican Chicken Soup
I created this soup after I made a bunch of chicken stock from a couple of Costco rotisserie chickens. I wanted a Mexican-style soup that was loaded with healthy vegetables, had a hit of smoky flavor and was not creamy.

This soup turned out super! our family loves it and we have really enjoyed the leftovers. It is warming for these cool fall evenings we are having.

I really like the zucchini in this soup. I used a huge tough zucchini from our garden for this soup. I peeled it and then removed all the seeds. I then chopped it into small cubes. The older zucchini stay nicely firm in simmered soups. If you have tender zucchini, add it towards the end of cooking time, so that you don't turn it into mush.


Leila's Smoky Mexican Chicken Soup Recipe:

1/2 pound bacon
1 extra-large onion, minced
6 large cloves garlic, smashed
2 stalks celery with tops, minced
3 large mild chiles, fire roasted and then cored, seeded and minced
4 tomatillos, minced
4 roma tomatoes, diced
1 14.5-ounce can petite diced tomatoes with chipotle chiles
1 7-ounce can La Victoria Fire Roasted diced green chiles (this brand has the best roasted flavor)
3 quarts chicken stock (home made is best)
1 bay leaf
1 t. ground cumin
2 14.8-ounce cans Great Northern beans, drained
1 29-ounce can Mexican-style hominy, drained
2 zucchini, cubed
1 T. sea salt, to taste
35 grinds fresh ground pepper, to taste
2 to 4 cups shredded cooked chicken meat
Smokey paprika, optional, to taste


Method:

Over a gas flame, char the whole chiles, then remove stem and seeds and mince. Set aside.

In a large soup pot, fry the bacon until crispy. Remove bacon and crumble, then set aside.

With the bacon fat left in the pot, saute on medium-high heat, the onion, garlic, celery, chilies, and tomatillos, until the onion becomes transparent.

Add the canned tomatoes and canned green chiles. then add the chicken stock.

Add the bay leaf, cumin, canned beans, hominy, and diced zucchini. Bring up to a boil. Once boiling, turn down to a simmer and let it simmer about 30 minutes.

Season the soup with the salt and pepper, to taste. Add the crumbled bacon and shredded cooked chicken meat. let simmer a few more minutes before serving. Check the seasoning.

Garnish the soup with sour cream, shredded cheese, cilantro, lime wedges, corn chips, as desired.


Notes:

Use gluten-free corn chips if desired.

If avoiding corn, omit the hominy and corn chips.

If dairy-free, omit the cheese and sour cream garnishes.

For a vegan option, omit bacon and saute the vegetables in deodorized coconut oil. Add smokey paprika to give a nice smoky flavor. Use vegetable broth in place of the chicken stock. add an extra can of beans in place of the shredded chicken.

In place of the canned petite diced tomatoes with chipotle chiles, use regular diced Mexican or plain diced tomatoes. Add these additional seasonings: 1/4 t. Mexican oregano, 1/4 t. dried chipotle powder, 1/4 t. additional cumin, to taste.


Enjoy,

Leila.


Tuesday, October 13, 2015

Speedy Thai Turkey Snacks - Low Carb, Gluten-Free

Thai Turkey Snacks
Try this quick tasty snack next time the munchies hit - You will be doing yourself a favor with this high-protein, low-carb treat.

This is a very tasty and very quick use for canned turkey or chicken. Our low-carb, sweet Fiji Hot Sauce is the perfect accompaniment to this mayonnaise based meat mixture. Topping with fresh basil leaves adds a little cheer and flavor dimension. Use Thai basil if you have it!

I like this as a quick lunch, served along side some fresh sliced fruit. I love that it's so low-carb when used to top cucumber slices. I do love the taste of sesame rice crackers though...

If you are short on ingredients, you can omit the Fiji Sauce and basil, but that kinda takes all the fun out of it. Don't get me wrong, it's still good though.

Try this for a lunch at work, or take on a picnic and serve with a salad and fruit. Serve this to your kids as an afternoon snack. When you get the munchies before bed, eat this in a romaine lettuce leaf, or on top of cucumbers, and you will have avoided the tempting high-carb snacks most people reach for. It's SO easy to make, it's hard not to try this recipe :)


Thai Turkey Snacks:

1 can turkey or chicken meat
1/4 c. mayonnaise, to taste
fresh ground pepper, to taste
seasoned salt, to taste
cucumber slices or artisan GF sesame seed rice crackers
Fiji Sauce (Thai chili sauce) See recipe on this blog
fresh basil leaves


Method:

Drain the juice from the canned turkey or chicken and place the meat in a small bowl.

Add a dollop of your favorite mayonnaise, to taste. Mix together well.

Season the meat mixture with ground black pepper and seasoned salt to taste.

Portion the meat mixture on top of the cucumber slices or crackers.

Drizzle the tops with Fiji Sauce and place a basil leaf on top.

Serve immediately.


A good cracker to serve with the meat filling.
Doesn't that FIJI SAUCE look good?


Enjoy,

Leila

Monday, October 12, 2015

Favorite Rosemary Lemon Chicken - Italian Restaurant Copy-Cat

Rosemary Lemon Chicken
Flavor-packed Rosemary Lemon Chicken that is better than any restaurant! 

This recipe is now one of our family favorites. It is so juicy and bright tasting. It's also easy!

My daughter Naomi is a foodie too. She was inspired last month to make this dish. She felt like creating a zippy skillet chicken featuring rosemary and lemon. I offered her the ideas of adding fresh garlic, brining the meat beforehand for more rosemary flavor, and making a tasty glaze at the end. I let Naomi take the lead on this one, which was fun. I brined the meat. she cooked and seasoned it, then I made the final glaze, with her watching me so I could teach her how to do it. She seasoned it perfectly (proud mom smiling). I have told all of my children that a secret to being a great cook is just knowing what good food tastes like! It's kinda like knowing your destination before you get there, so then you will know when you have arrived.

Glazed Rosemary Lemon Chicken
We made this dish again together last night. Naomi says we have to put this on our blog, and I definitely agree. So now I'm sharing our recipe with you!

I highly recommend brining your chicken, so plan ahead a bit. Fresh rosemary is wonderful here, although dried will work OK. If you must use dried rosemary, boil your 1 cup of water and pour it over the rosemary, cover and steep like you would when making an herbal tea. This will infuse your chicken with a stronger rosemary flavor more quickly. This dish is supposed to have a big hit of rosemary. YUM.


Rosemary Lemon Chicken Recipe:

Serves: 6

BRINE:
1 c. hot water
2 T. sea salt
1 t. Lakanto sweetener (erythritol + monk fruit)
1 clove garlic, smashed into a paste with some of the sea salt
20 grinds black pepper
1 t. fresh rosemary leaves, smashed with some of the sea salt
cold water, to cover the chicken

CHICKEN:
6 skinless boneless organic chicken breasts, thawed
2 T. organic butter or ghee
2 T. deodorized coconut oil
4 cloves garlic
1/2 lemon, juiced
2 sprigs fresh rosemary
1/2 t. lemon pepper seasoning
1/4 t. dried basil

GLAZE:
1/2 c. water
1 t. organic chicken base
1 t. tapioca starch
1 T. butter, optional

GARNISH:
Rosemary sprigs
Thin sliced lemon


Method:

BRINE:

Dissolve the sea salt and Lakanto sweetener into the cup of hot water. Add the garlic, rosemary, and black pepper. Stir together and let steep together a few minutes while you prep the chicken meat.

Thaw the chicken meat and trim off any excess fat. Place in a large shallow bowl.

Pour the salt water mixture over the chicken. Add enough cold water to completely immerse the meat. Let the chicken marinate in the brine for 2 hours. May also marinate in a large (1-gallon) zip-lock bag.

CHICKEN:

When you are ready to cook the chicken, remove chicken from the brine and let drain. Heat the butter and coconut oil in a large skillet over medium-high heat. Add the 4 cloves of smashed garlic and place the chicken in the pan. Lower the heat to medium.

Squeeze half of the lemon juice over top and sprinkle with half of the rosemary, which has been stripped off it's stem. Sprinkle the chicken with the lemon pepper and basil.

Cook uncovered until the chicken starts to look golden brown underneath.

Flip the chicken over and sprinkle with the remaining rosemary leaves. cook until golden brown on the other side. Check meat to make sure it is cooked through (you should see no pink in the center).

Remove the meat to a serving platter and set aside. Leave the drippings in the pan.

GLAZE:

For the glaze, mix the chicken base and tapioca starch into the 1/2 cup water.

Heat the frying pan with the drippings to medium-high. Pour the starch mixture into the pan and whisk until thickened and bubbly. Add additional butter, if desired.

Squeeze the rest of the lemon juice over top the glaze and whisk in. taste for seasoning.

Pour glaze over the hot chicken and serve immediately.

Garnish with fresh sprigs of rosemary leaves and lemon slices if desired.


NOTES:

If your frying pan is too small, your meat wont brown because too much moisture accumulates. If this happens, just cook the meat on both sides until completely cooked through. Transfer 3 breasts at a time to a new fry pan of sizzling butter and quickly brown on both sides. Repeat with the last 3 breasts. Scrape the leftover butter into the pan with the rosemary drippings and continue on with making the glaze.

You may add the zest from the half lemon, if desired (use an organic lemon for this).

The brined chicken stays very moist and does not need additional salt added. It is forgiving if you accidentally over-cook it. Make sure that you have added enough fresh lemon juice at the end. The flavor should be robust with rosemary, yet bright from the citrus, and not too tart.


Photos of the process:


ENJOY!

Leila